Showing posts with label Craftwell eBosser. Show all posts

Wednesday, September 10, 2014

A Little Note Card with Craftwell

 A little note sending you lots of hugs, I just love the small envelop that is on the "Stay Connect" Die set from Craftwell. So I made my card using several of them because I wanted to make sure you knew I was sending lots of hugs!!!! I began my card by first running a piece of white card stock through me eBosser using an embossing folder, placing it on a piece of pattern paper and then to the top of my card base.
 I began by layering my eBosser platforms together along with my pattern paper and envelop die and ran them through the eBosser not once but five times because that is how many envelopes I wanted to make.
 Once I cut them all out...
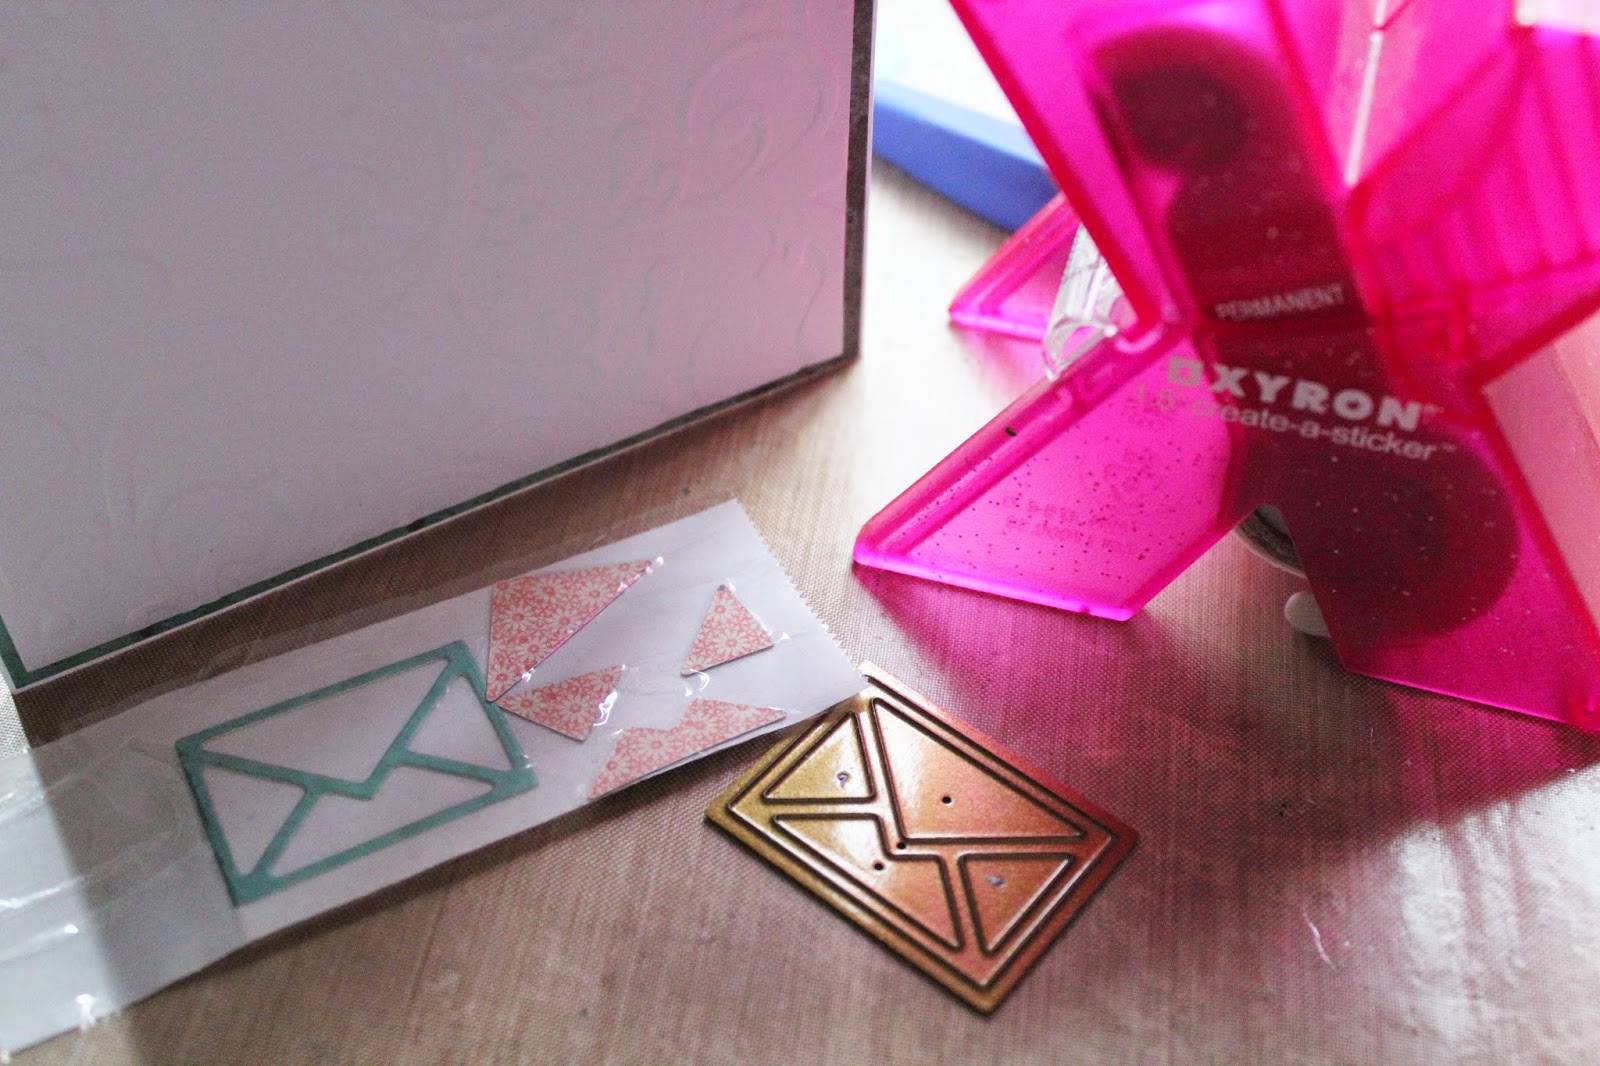
 I ran them through my Xyron "X" Sticker maker...it sure makes it easy when you are making several of them.
 After I had all my little envelop made from the Stay Connected Die Set, I stamped an image and sentiment from two different stamp sets and then wrote the "lots of" on the piece before I place it to my card front with pop dots. (Color your image prior to placing on your card.)  Once in place add all the fun envelops to the front of your card along with a pretty ribbon and a few gemstones.
Here is a closer look at the Stay Connected Die Set. I hope you check it out along with other inspiring projects that are being share on the Craftwell Blog this month. Hugs Pammejo
Supplies:
Craftwell eBosser
Craftwell Stay Connected
Couture Creations Taylor Embossing Folder
Hero Arts A Little Note and XO Stamp Set
WeR Memory Keepers Pattern Paper
Copic Markers
Xyron "X" Sticker Maker
Gemstones
Riboon

Wednesday, August 20, 2014

A La Mode Layout with Fancy Pants and Crafwell


Hi it is Pam to day sharing with you Fancy Pants Nautical Collection using my eBosser from Craftwell. As soon as I seen the collection I knew I wanted to do a layout of my husband with his new toy...the A La Mode.
I began by first cutting a strip from the collection and then random laid circle dies on my paper and ran it through the eBosser. Once the circles were cut out I placed it on my stripe background paper.

I repeated using Rockstar Alphabet dies and a piece of the yellow paper from the Nautical Collection.
Once I had them cut I ran them through Xyron "X" Sticker Maker.  It is really a fabulous tool for all the little pieces you cut out.
Here is a closer look at the circles and the letters once they are placed on the layout. I added a bit of twine over the top of the flags and a few bows to give added dimension. 
Hold on to those circles you cut out and layer them together or just add them here and there it gives your piece a great look.
Supplies:
Xyron X Sticker Maker
Xyron Adhesive

Tuesday, August 19, 2014

Deepest Sympathy Card with SinCity Stamps

 Today I am sharing with you my Deepest Sympathy Card from my newest Sympathy Stamp
 Set with SinCity Stamps. The Sympathy Set was designed with handwritten sentiments as well as images to give your cards a more intimate feel. I hope will check out the set in the SinCity Stamp Store as well as my previous Tuesday post sharing how to use them on other cards.
 I used pattern paper from We R Memory Keepers Chalkboard Collection. I stamped my sentiment on to a white circle and layered it on to my Nesting Floral Doily. Placed it on my card front with my flowers that I made.
I added a dark yellow bow as well as a border to the inside of my card. I hope you liked my Deepest Sympathy Card and check out the whole Memories Set in the SinCity Stamp Store. Hugs Pammejo
Supplies:
We R Memory Keepers Chalkboard Collection
Lifestyle Crafts Nesting Floral Doily Die
Crafters  Companion Embossing Folder
Tim Holtz PineCone and Flower Die
Craftwell eBosser
Xyron Tape Runner
EK Success Scallop Border Die
Black Ink
Ribbon
Gemstones

Wednesday, August 13, 2014

Boy Oh Boy with Fancy Pants and Craftwell

Boy oh Boy!!! I love this photo of our grandson fishing with his grandpa. He has to be one of the most energetic and adventurous boys I know and I thought the Be Different Collection from Fancy Pants was perfect.
I started my layout by running a 6" x 9" piece of green paper from the collection through my eBosser using the Teresa Collins Woodgrain Embossing Folder. 
Don't you think it gave the green paper an amazing look. Once I had my embossed paper and other papers in place. I added my matted photo, a few flags that I cut out along with stickers and flair embellishments to the embossed paper. 
I added a few strips of paper and one more flair embellishments to the corner. 
I love the large Boy Oh Boy Die Cut from the Be Different Collection. It worked perfect with my layout. 
I hope you enjoyed my layout and remember "In Order to be Irreplaceable, One Must Always Be Different".  Hugs Pammejo
Supples:
Tiny Attacher
Xyron Adhesive
Random metal arrow

Wednesday, August 6, 2014

You're Invited with Fancy Pants and Craftwell

 Welcome to Wednesday with Crafwell and our fabulous sponsor Fancy Pants. I am loving the Be Different Collection, I just love all the little monsters. They make me smile. Today I am going to share with you how to make some quick and easy party invitations using those little monsters from the paper.
F
 First you need to run your paper through your eBosser lining up your Sizzix Envelope/Seed Packet Die.
 Fold and glue sides. I added a strip around mine with one of the borders from the paper.
Die cut your Medallion Die from Spellbinders using the eBosser.
And to finish off your party invitation fussy cut one of the fun monsters from the paper and add to front with one of the tickets using pop dots. I hope you will try making some invitations using the eBosser and check out Fancy Pants for other fabulous collections. Hug Pammejo
Supplies:
Craftwell eBosser
Fancy Pants Be Different Collection
Sizzix Envelope/Seed Packet
Spellbinders Medallion Die
Adhesive and Pop Dots

Tuesday, July 29, 2014

Thank You Card with Core'dinations and Craftwell

 Hi it is Pam today sharing a big Thank You to Core'dinations for being this months sponsor with us at Craftwell.
 I started my card by running the Core'dinations ColorCore paper through my eBosser along with a Nesting Doily Die from LifeStyle Crafts.
I just love the beautiful impression that Teresa Collins Damask Embossing Folder makes using the Core'dinations Paper. (Make sure to lightly sand once you have embossed to get a full affect of the color core center.) Thanks for stopping by and look forward to sharing with you next week. Hugs Pammejo
Supplies:
We R Memory Keepers Paper
LifeStyle Crafts Nesting Doily Die
SinCity Stamps Memories Set
SinCity Stamps Sympathy Set
Black Ink
Wood Butterfly
Random Flowers
Grey Ribbon
Sanding Block

Thursday, July 24, 2014

Hot Air Balloon Party Favor with Core'dinations and Craftwell

Hi today I am sharing with you how to  make Hot Air Balloon Party Favor Boxes. These are super easy to make and can be used for lots of different occasions...
Start by getting your eBosser ready with the platforms and your hot air balloon die, along with your Core'dinations Nostalgic Paper Pad. Cut two of each of the balloons using your favorite papers from the paper pad.
This is the amazing part...see how many of the balloons you can place on the eBosser platforms using Teresa Collins Damask Embossing Folder. 
After you have your hot air balloon cut and embossed, sand both sides using your sanding block.
Stack the balloons and sew down the center.
Cut your box out, using the eBosser and Teresa Collins Woodgrain Embossing Folder, emboss. Ink front and back of pieces and form box. 
Here is a closer look at the box once it was formed and decorated. 
I placed my hot air balloon into the box and added candy after it was decorated. I hope you enjoyed my Hot Air Candy Box Party Favor Box and try to make some for yourself. Hugs Pammejo
Supplies:
Teresa Collins WoodGrain Embossing Folder
Sizzix Small Scoreboard Artist Box
Tim Holtz Distress Ink
Sanding Block
Eyelash Lace
Wooded Birds
Random Flowers

Wednesday, July 16, 2014

Rose Thank You Card with Craftwell and Core'dinations

I love making Thank You Cards...I feel we all need to remember to send thank you cards out more often, it is always nice to receive something pretty in the mail when you want to say thanks to someone. 
And the gorgeous Core'dinations ColorCore Nostalgia Cardstock makes it so easy to make multiples of any card especially when you are using Teresa Collins large embossing folders.
I cut my pieces from 3 different pieces of the shades of purple from the pad and did a border punch on the lightest of the paper...
 Layered them all at once onto the Damask Embossing Folder....
Running them through the eBosser at one time, how cool is that....
 And there you have it, all beautifully embossed, all at once....like I said super easy to make multiples of the thank you card.
 Layer the pieces on to your card base....
I added a pretty rose that I colored in using my Copic Markers to the center of my card, along with some stick pins, ribbon and sentiment to the front to finish my Rose Thank You Card with. Hugs Pammejo
Supplies:
Copic Marker
Stick Pins
Seam Binding


Wednesday, July 9, 2014

Smile Card with Core'dinations and Crafwell eBosser

Smile ... don't you love the embossed sentiment...
I created it by running a small piece of the yellow distress paper from the Core'dinations Nostalgic Paper Pad through the eBosser using Teresa Collins Beautiful Word embossing folder, cutting it just around the edges with a pair of scissors...love the words on this fabulous folder.
BUT...first I had to build my card base up, so first place a piece of blue distress paper from the Core'dinations Nostalgic Paper Pad and run it through the eBosser using Teresa Collins Damask embossing folder.
Once my embossed piece was made, place it on to the diagonal strip paper form the Memories paper.


Taking the Doily paper and the Journal page cut out the two pieces you would like to use, taking your Doily Dies, place on the paper...I used washi tape to hold it into place so I could flip it over onto the magnetic sheet.  Once die cut place on top of the embossed Damask piece.
Add the doilies that you die cut out and place on card base along with the Good Times piece from the Memories paper. Add ribbon to card front and layer to card base with pop dots.

I cut flower piece from a flower die using the yellow Distress paper from the Core'dinations Nostalgic Paper Pad.
Rolling the flowers with a stylus and using a pair of tweezers to form the petals, layer them together to form your flowers and apply to the front of your card.  Hope you have a fabulous day full of smiles. Hugs Pammejo
Supplies:
Craftwell eBosser
Core'dinations Nostalgia Kraft Core Paper Pad
Teresa Collins Memories Paper
Teresa Collins Beautiful Words Embossing Folder
Teresa Collins Damask Embossing Folder
LifestyeCrafts/QuickCutz Nesting Circle Doily Die
Sizzix Tim Holtz Flower Die
My Minds Eye Enamel Dots
White Seam Binding
Pop Dots