Wednesday, May 29, 2019

See the Beauty Card and Tag Set with Authentique


Hi everyone!  
"See the Beauty around You" Card and Tag Set using Authentique Glamour Collection!!! 
The Glamour Collection is definitely a beautiful collection of hues of cream, blues and browns which makes it the perfect collection to create easy card set with. 


Create a card box by cutting a chipboard with the Sizzix Card Box die.( Or use a narrow box.)
 Cover box with Glamour pattern papers, borders, strips and gemstones. 
Create a laminated Glamour Epherema Card or two to place inside of prepared card box.


Place a matted Epherema Card from the Glamour Collection to the front of card box using pop dots.


Create a few flowers using Glamour pattern paper using the Stitchy Flower die. (You can use another of your favorite flower die or pre-made florals.)


Add small metal filigree, mirror and bow to card box.


Create a set of cards using the same design to place inside of prepared box.


Create 3 or 4 cards.  (I created 3 cards)


Create cards by layering pattern paper on card bases, add border strips and small elements to card front using a top dot.


Punch Glamour pattern paper mat using Notebook Punch; mat on corresponding pattern paper. 
Add to front of cards with pop dots. 
Die cut butterflies from pattern paper; layer together . 
Add to front of prepared mats; add metal pen tip to center of butterflies.


Add different sentiments from the Glamour Detail Sheet to front of cards with pop dots.


Place cards inside of box to finish your "See the Beauty" Card and Tag Set.
 I hope you are inspired to create some beautiful card sets.
 Enjoy! Pam

Supplies: 
Authentique Glamour Collection
Sizzix: Card Die, Stitchy Flower Die, Tattered Butterfly Die
Xyron Creative Station with Laminate Refill
MayArts Blue Varigated Ribbon
Metal Mirror, Filigree and Pen Tips
3 - 5" x 6 1/2" Card Base
Scallop Border Punch
Notebook Punch
Deco Punch
Blue and Clear Gemstones
Pop Dots


Thursday, May 23, 2019

Liberty BBQ Party Favor Box and Card with Laminate Tags - Xyron


Hi Xyron Fans! Memorial Day is just a few days away and it will be time to PARTY!
So lets make a few Party Favor Boxes and a few cards with laminate tags to celebrate with! 


Begin by running strips of pattern paper through Xyron Creative Station Lite with Permanent Adhesive


Adhere to premade party favor box. 
Add border strips to sides of box Xyron Tape Runner with Permanent Adhesive.


Add pattern Liberty Epherema Card to top of tag with Xyron Tape Runner with Permanent Adhesive.


Tie prepared tag to top of Liberty Party Favor Box; add sticker with pop dots. 


Adhere pattern paper and doily to front of card with Xyron Tape Runner with Permanent Adhesive.


Add Epherema Card to front of pattern paper with Xyron Tape Runner with Permanent Adhesive.

Add prepared Epherema Card to front of card front with pop dots. 
Add sticker to front along with a small metal star. 


Tie ribbon around card; tie bow. 


Form pocket inside of card using Xyron Tape Runner with Permanent Adhesive.


Remove Xyron Permanent Adhesive; insert Xyron Laminate Adhesive. 


Run two Epherema Tags through Xyron Creative Station Lite with Laminate Adhesive. 


Add ribbon to top of tags. 


Insert tags inside of card pocket. 
I hope you are inspired to create a few cards and party favor boxes over the summer for all your party. Pam

Supplies:
Xyron Creative Station Lite with Permanent Adhesive
Xyron Laminate Adhesive
Xyron Tape Runner with Permanent Adhesive
Authentique Liberty Collection
May Arts Ribbon
5" x 6 1/2" Cram Card Base
Party Favor Boxes

Products Linked in Affiliate Supply List for convenience. 


DISCLAIMERS
This blog is compensated to provide opinion on products, services, websites, and various other topics. Even though the owner(s) of this blog receives compensation for our posts or advertisements.I always give my honest opinions, findings, beliefs, or experiences on those topics or products. The views and opinions expressed on this blog are purely my own. Any product claim, statistic, quote or other representation about a product or service should be verified with each manufacturer, provider, or party in question.This blog contains affiliate links, clicking and shopping through these links helps to support and run Pam Bray Designs - Scrapbook Flair Blog at no additional cost to you. Today's features are Xyron Products. 

Wednesday, May 22, 2019

Hero Fold Up Card Box with ColorBox


Hi! I appreciate all the Hero' in our lives that serve in or have served in our communities. I can't say thank you loud enough or often enough....BUT...Thank You...For Being Amazing!!!


Cut two pieces of white card stock to measure 5" x 7". Score at 4' and 6" marks.


Adhere seams together.


To form box.


Cut three 1 1/2" x 4 1/2" white card stock. Score 1/4" on each side of strip to create inserts for card box.


Adhere inserts into box card.


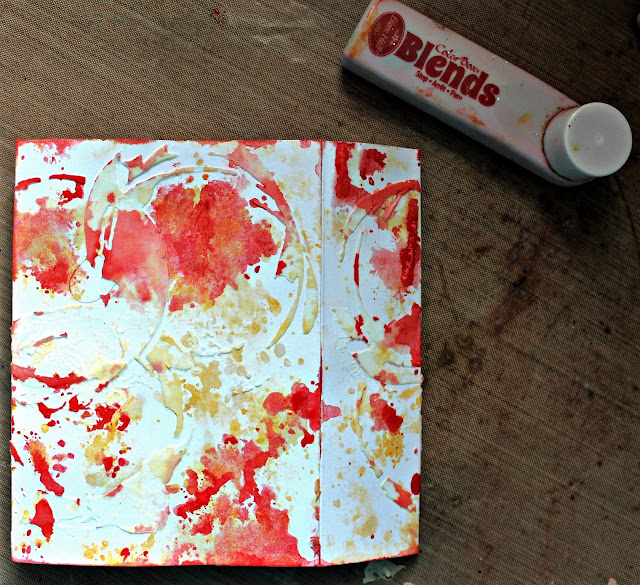
Lay ColorBox Ringer Art Screen on prepared card box making sure to keep it flat. Apply modeling paste with palette knife. Dry. Repeat on other side of card box. Dry.


Apply ColorBox Sunshine Blends Ink to craft sheet; mist with water. Press prepared card box into mist; dry. Repeat on other side of card box.


Apply ColorBox Stop Blends Ink to craft sheet; mist with water. Press prepared card box into mist; dry. Repeat on other side of card box. 


Stamp stars from ColorBox Big Thanks Clear Stamp Set with ColorBox Uniform Blends Ink. Repeat with background stamp.


Cut 4 strips of white cardstock. Apply ColorBox Blends Sunshine, Uniform, Nutmeg and Stop Ink to each strip.


Stamp sentiment from ColorBox Big Thanks Clear Stamp Set with ColorBox Premium Licorice Dye Ink to prepared paper.  Stamp star image with ColorBox Blend Stop ink to prepared paper.


Punch stars from prepared paper; stamp background images with coordinating ColorBox Blends Inks. Repeat with Nutmeg inked paper.


Cut narrow strips from the prepared Nutmeg paper; adhere prepared sentiments to strips. Adhere sentiments to card box.


Layer stars together; adhere to strips of prepared paper. Add to card box.


Ink chipboard letters with ColorBox Blends Uniform Ink; adhere to front of card box. Add small metal stars to card box.


Add twine bow to card box.


Fold card flat to place in envelop.


Open up when it is receive. I hope you have fun creating some Fold Up Card Boxes using this simple tutorial along with ColorBox products. Pam

Supplies:
ColorBox Art Screen: Ringer
ColorBox Blends Ink: Sunshine, Uniform, Stop, and Nutmeg
ColorBox Big Thanks Clear Stamps
ColorBox Premium Licorice Dye Ink
Blank Page Muse Grunge Stamp Set
1 3/4", 1 1/2" and 1" Star Punch
White Card Stock
Modeling Paste
Metal Stars
Adhesive
Pop Dots
Palette Knife
Red Twine
Scoreboard
DISCLAIMER

This blog is compensated to provide opinion on products, services, websites, and various other topics. Even though the owner(s) of this blog receives compensation for our posts or advertisements, I always give my honest opinions, findings, beliefs, or experiences on those topics or products. The views and opinions expressed on this blog are purely my own. Any product claim, statistic, quote or other representation about a product or service should be verified with each manufacturer, provider, or party in question.This blog contains affiliate links, clicking and shopping through these links helps to support and run Pam Bray Designs - Scrapbook Flair Blog at no additional cost to you..

Monday, May 20, 2019

Cherish Canvas with Creative Scrapbooker Magazine


Hi Pam here today … are you ready to Cherish every moment when you are able to create! I will be sharing how to create a simple mixed media canvas using ColorBox Blends 2 inks along with stamps from Blank Page Muse!


Apply Blends 2 Inks to an 8" x 8" canvas. Dry.


Spatter Canvas with DecoArt Carbon Blank and Titanium White Paint. Dry.
Lay ColorBox ZigZag Art Screen on top of prepared canvas; apply DecoArt Titanium White Paint using stencil brush. Dry.


Stamp background images using DecoArt Carbon Black Ink. Dry


Stamp flower image from Blank Page Muse Scribble and Scratch Stamp Set on white paper using ColorBox Clear Ink. Emboss flowers with Emerald Creek Craft Supplies Glacier White Embossing Powder. Ink over the top of prepared flowers using ColorBox Blends 2 Sunshine and Wildberry Inks.
Fussy cut flower out.


Stamp leaf image from Blank Page Muse Scribble and Scratch Stamp Set on white paper using ColorBox Clear Ink. Emboss leaves  with Emerald Creek Craft Supplies Glacier White Embossing Powder. Ink over the top of prepared leaves  using ColorBox Blends 2 Sunshine and Leaf Inks. 
Fussy cut leaves out.


Adhere wire jute, flowers and leaves to top of prepared canvas.


Add yellow enamel dots to center of flowers. 


Add ribbon and twine bow to canvas.


Apply ColorBox Blends Wildberry Ink to "Cherish" chipboard. Stamp using Blank Page Muse Scribble and Scratch background stamp and DecoArt Titanium White paint; dry. Adhere to prepared canvas. Adhere metal butterfly.


Apply ColorBox Blends Wildberry Ink to chipboard corner filligree. Stamp using Blank Page Muse Scribble and Scratch background stamp and DecoArt Titanium White paint; dry. Adhere to prepared canvas. Adhere metal butterfly. 


I hope you are inspired to create a few mixed media canvas using your favorite stamps and inks. Enjoy Pam

Supplies:
ColorBox Blends 2 Inks: Sunshine, Beach, Wildberry, and Leaf
8" x 8" Canvas
Blank Page Muse Scribble and Scratch Stamp Set
DecoArt Carbon Black and Titanium White Paint
ColorBox ZigZag Art Screen
Stencil Brush
Wire Jute Rope
Hot Glue Gun and Glue Sticks
Yellow Enamel Dots
Yellow Ribbon
Tan Twine
Chipboard Cherish Sentiment and Corner Filligree
Metal Butterfly