Monday, January 31, 2022

Seek the Good Mixed Media Phone Stand with Tutorial - Eileen Hull Designs and Gel Press


Eileen Hull/Sizzix Chapter 1 Release
are you excited!!!
The dies in this collection are versatile, practical and fun to embellish.
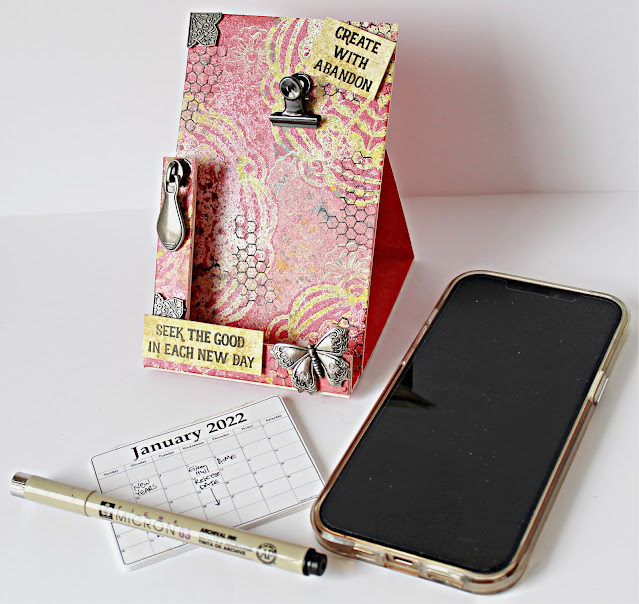
The Phone Stand, an XL Score Boards die, is a MUST- you need one for every room!
Make for yourself, family, friends, for gifts or to sell- the die cuts the stand in one pass and is very easy to assemble.
The Book Box can be used to make a book or a box that holds A-2 greeting cards.
What a great way to package handmade cards ... or a quick and easy book!
The Vintage Buttons folder creates vintage backgrounds for cards, journals, pages and tags.
The Snail Mail Thinlits die cuts a postal panel that coordinates with two of Eileen's Snail Mail Maker Forte stamps.
This die was designed to use on the front of an A-2 card!
The dies may be found in local scrapbook stores and Eileen's Etsy store: https://www.etsy.com/shop/EileenHull


Happy February!!!
What a fun way to start the month!!!
Eillen Hull/Sizzix Chapter 1 products are being released! 
Last month I shared a sneak peek of the phone stand I created and today here is the tutorial!!!
 Check out how easy it is to create a phone stand/calendar organizer! 
 

Photo 1: Lay Gel Press 12 x 14 Monoprinting Plate on your workstation. Apply Crimson Stencil Butter using Gel Press Economy Brayer 6".
Photo 2: Die cut Heart Mandala Die #665587 from white card stock. Lay on prepared Gel Press.
Photo 4: Carefully remove mandala pieces. *Save for a future project. 


Photo 5: Spray with Distress Mica Spray. 
Photo 6: Carefully lay a piece of matboard on Gel Press .
Photo 7: Using leftover stencil butter that is on Gel Press go over top of matboard. 
Photo 8: Carefully remove prepared matboard; dry.  Form stand. 


Print calendar pieces; fussy cut around each piece 


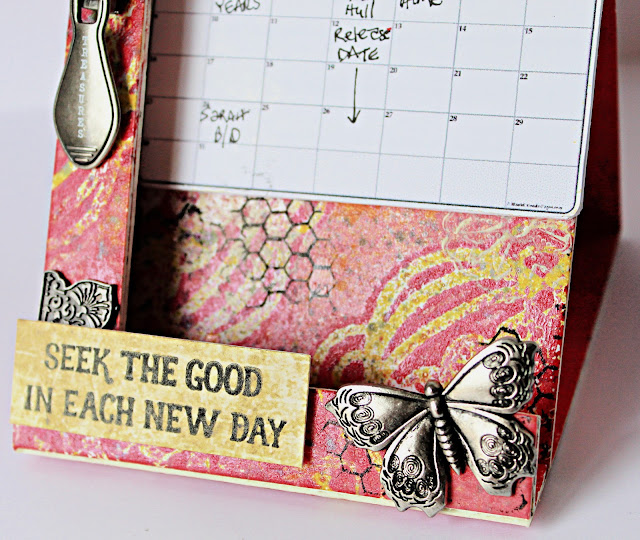
Stamp flower from Wonderful World Stamp using Titan Buff paint to top of prepared phone stand. 
Stamp sentiment from Snail Mail Stamp using black ink and paper; add to top of phone stand. 
Stamp honeycomb image with black ink to phone stand. 
Add metal corner piece to top left corner of phone stand. 
Add metal clip to center of phone stand. 


Add prepared sentiment to front of phone stand along with metal butterfly. 


Die cut two front pieces of phone stand to create pen container. 
*Pen container is open on inside. 


Stack calendar pieces together and clip to top of phone stand. 


Add a few more metal pieces to phone stand. 


I hope you are inspired and are ready to create some fabulous projects using Eileen Hull Designs fabulous products!
ALSO...
WON'T YOU COME JOIN US!!!
Lots of eye candy, fabulous tutorial, etc.
Best of all you don't want to miss Eileen's Live Shows!
Always so much fun!

I know you will truly be inspired! 
Enjoy Pam


DISCLAIMERS
This blog is compensated to provide opinion on products, services, websites, and various other topics. Even though the owner(s) of this blog receives compensation for our posts or advertisements. I always give my honest opinions, findings, beliefs, or experiences on those topics or products. The views and opinions expressed on this blog are purely my own. Any product claim, statistic, quote or other representation about a product or service should be verified with each manufacturer, provider, or party in question/This blog contains affiliate links, clicking and shopping through these links helps to support and run Pam Bray Designs - Scrapbook Flair Blog at no additional cost to you. Today's features are Eileen Hull Designs Products.

Supplies:
Deco Art Titan Buff Paint
Ranger Distress Mica Spray
Metals
Pen
Printed Calendar Pieces
Black Ink
Adhesive


Friday, January 28, 2022

Love You Card


Love You!!!
DCC 
Don't you love non-traditional Valentine Cards!!!
Blank Page Muse Cyan Consortium makes it super easy to create those non-traditional mixed media cards. 
Layer Cyan Consortium pattern papers to top of 5" x 6 1/2" card base using Xyron Mega Tape Runner with Permanent Adhesive along with paper doily. 
Super cute and easy. 
Enjoy Pam


SUPPLIES
Precut Paper Doily
5" x 6 1/2" Card Base

DISCLAIMERS
This blog is compensated to provide opinion on products, services, websites, and various other topics. Even though the owner(s) of this blog receives compensation for our posts or advertisements. I always give my honest opinions, findings, beliefs, or experiences on those topics or products. The views and opinions expressed on this blog are purely my own. Any product claim, statistic, quote or other representation about a product or service should be verified with each manufacturer, provider, or party in question/This blog contains affiliate links, clicking and shopping through these links helps to support and run Pam Bray Designs - Scrapbook Flair Blog at no additional cost to you. Today's features are Pam Bray Designs and Blank Page Muse. 
 

Thursday, January 27, 2022

I Love You - Upcycle Blocks with Xyron Throwback Thursday


Hi Xyron Fans!!!
It is Throwback Thursday and who wouldn't "LOVE" a sweet Valentine Home Decor' piece! 
Can you say UPCYCLE!!!
I will show you how easy it is to UPCYCLE blocks using Xyron products to create a fun Valentine Decoration for your home or a gift!


I found these wood block after Christmas at the local craft store...
BUT...
You can use any size or kind of block to recreate with so don't let the blocks discourage you!


Begin by cutting and running strips of pattern paper through the 


Adhere prepared paper to side of blocks. 


Run narrow strips of pattern paper through


Cut pattern paper to fit inside of wood blocks or create mats for other blocks you are working with.Xyron Tape Runner with Permanent Adhesive.
Adhere prepared strips to side of block. 


Punch small heart images from pattern paper using 1/2" circle punch. 
Add prepared images to front of wood blocks.


Run pattern paper strips and scallop strips through 


Adhere prepared pattern strips to mats. 
Add black gemstones to small circle images.
Repeat with border and scallop strips around edges of wood blocks. 


Repeat for all 3 wood blocks. 


Punch three 2" scallop circles from pattern paper. Adhere using 
Die cut the letters "I" and "U" from pattern paper your favorite 2" die set, eclectic die cutting machine or use chipboard.
Adhere to 2 center of blocks using Xyron 1.5" Sticker Maker with Permanent Adhesive.


Punch 1 1/2" circle out of pattern paper; adhere to prepared middle block.
Stamp heart on pattern paper using black ink; fussy cut out. 
Place on prepared middle block with pop dots. 
Add small metal arrow to block,


Add stickers to each of the prepared wood block. 


Finished with small metal knobs to top of prepared block
. Enjoy Pam

Supplies:
                                                 Xyron Tape Runner with Permanent Adhesive
Deco Art Corner Punch
1 1/2" Circle Punch
2" Scallop Punch
Letters
Black Gemstones
2" Scallop Circle Punch
Upcycle Blocks
Metal Arrow and Knobs

DISCLAIMER:

This blog is compensated to provide opinion on products, services, websites, and various other topics. Even though the owner(s) of this blog receives compensation for our posts or advertisements. I always give my honest opinions, findings, beliefs, or experiences on those topics or products. The views and opinions expressed on this blog are purely my own. Any product claim, statistic, quote or other representation about a product or service should be verified with each manufacturer, provider, or party in question. This blog contains affiliate links, clicking and shopping through these links helps to support and run Pam Bray Designs - Scrapbook Flair Blog at no additional cost to you. Today's features are Xyron Products.

Wednesday, January 12, 2022

Seek the Good Mixed Media Phone Stand Sneak Peek with Eileen Hull and Gel Press


Are you excited for Eileen Hull Designs NEW Releases!!! 
This month Eileen Hull Design Teams will be rocking the Chapter 1 Dies and Embossing Folders from Sizzix using fun products from Gel Press! 
EXCITING TIMES with Sizzix and Eileen Hull Designs!
Chapter 1


Here us a sneak peek at Seek the Good Mixed Media Stand using both the Phone Stand Die and Heart Mandala Die. Full tutorial will be shared in February so get your Gel Press and paints ready!!! Enjoy Pam