Tuesday, November 28, 2023

NOEL Home Decor - Comfort and Joy with Eileen Hull Designs


GUESS WHAT!!!
It is almost DECEMBER!!!
Time to start thinking of Christmas projects and what better way but to create Home Decor! 
This project is super easy to create!
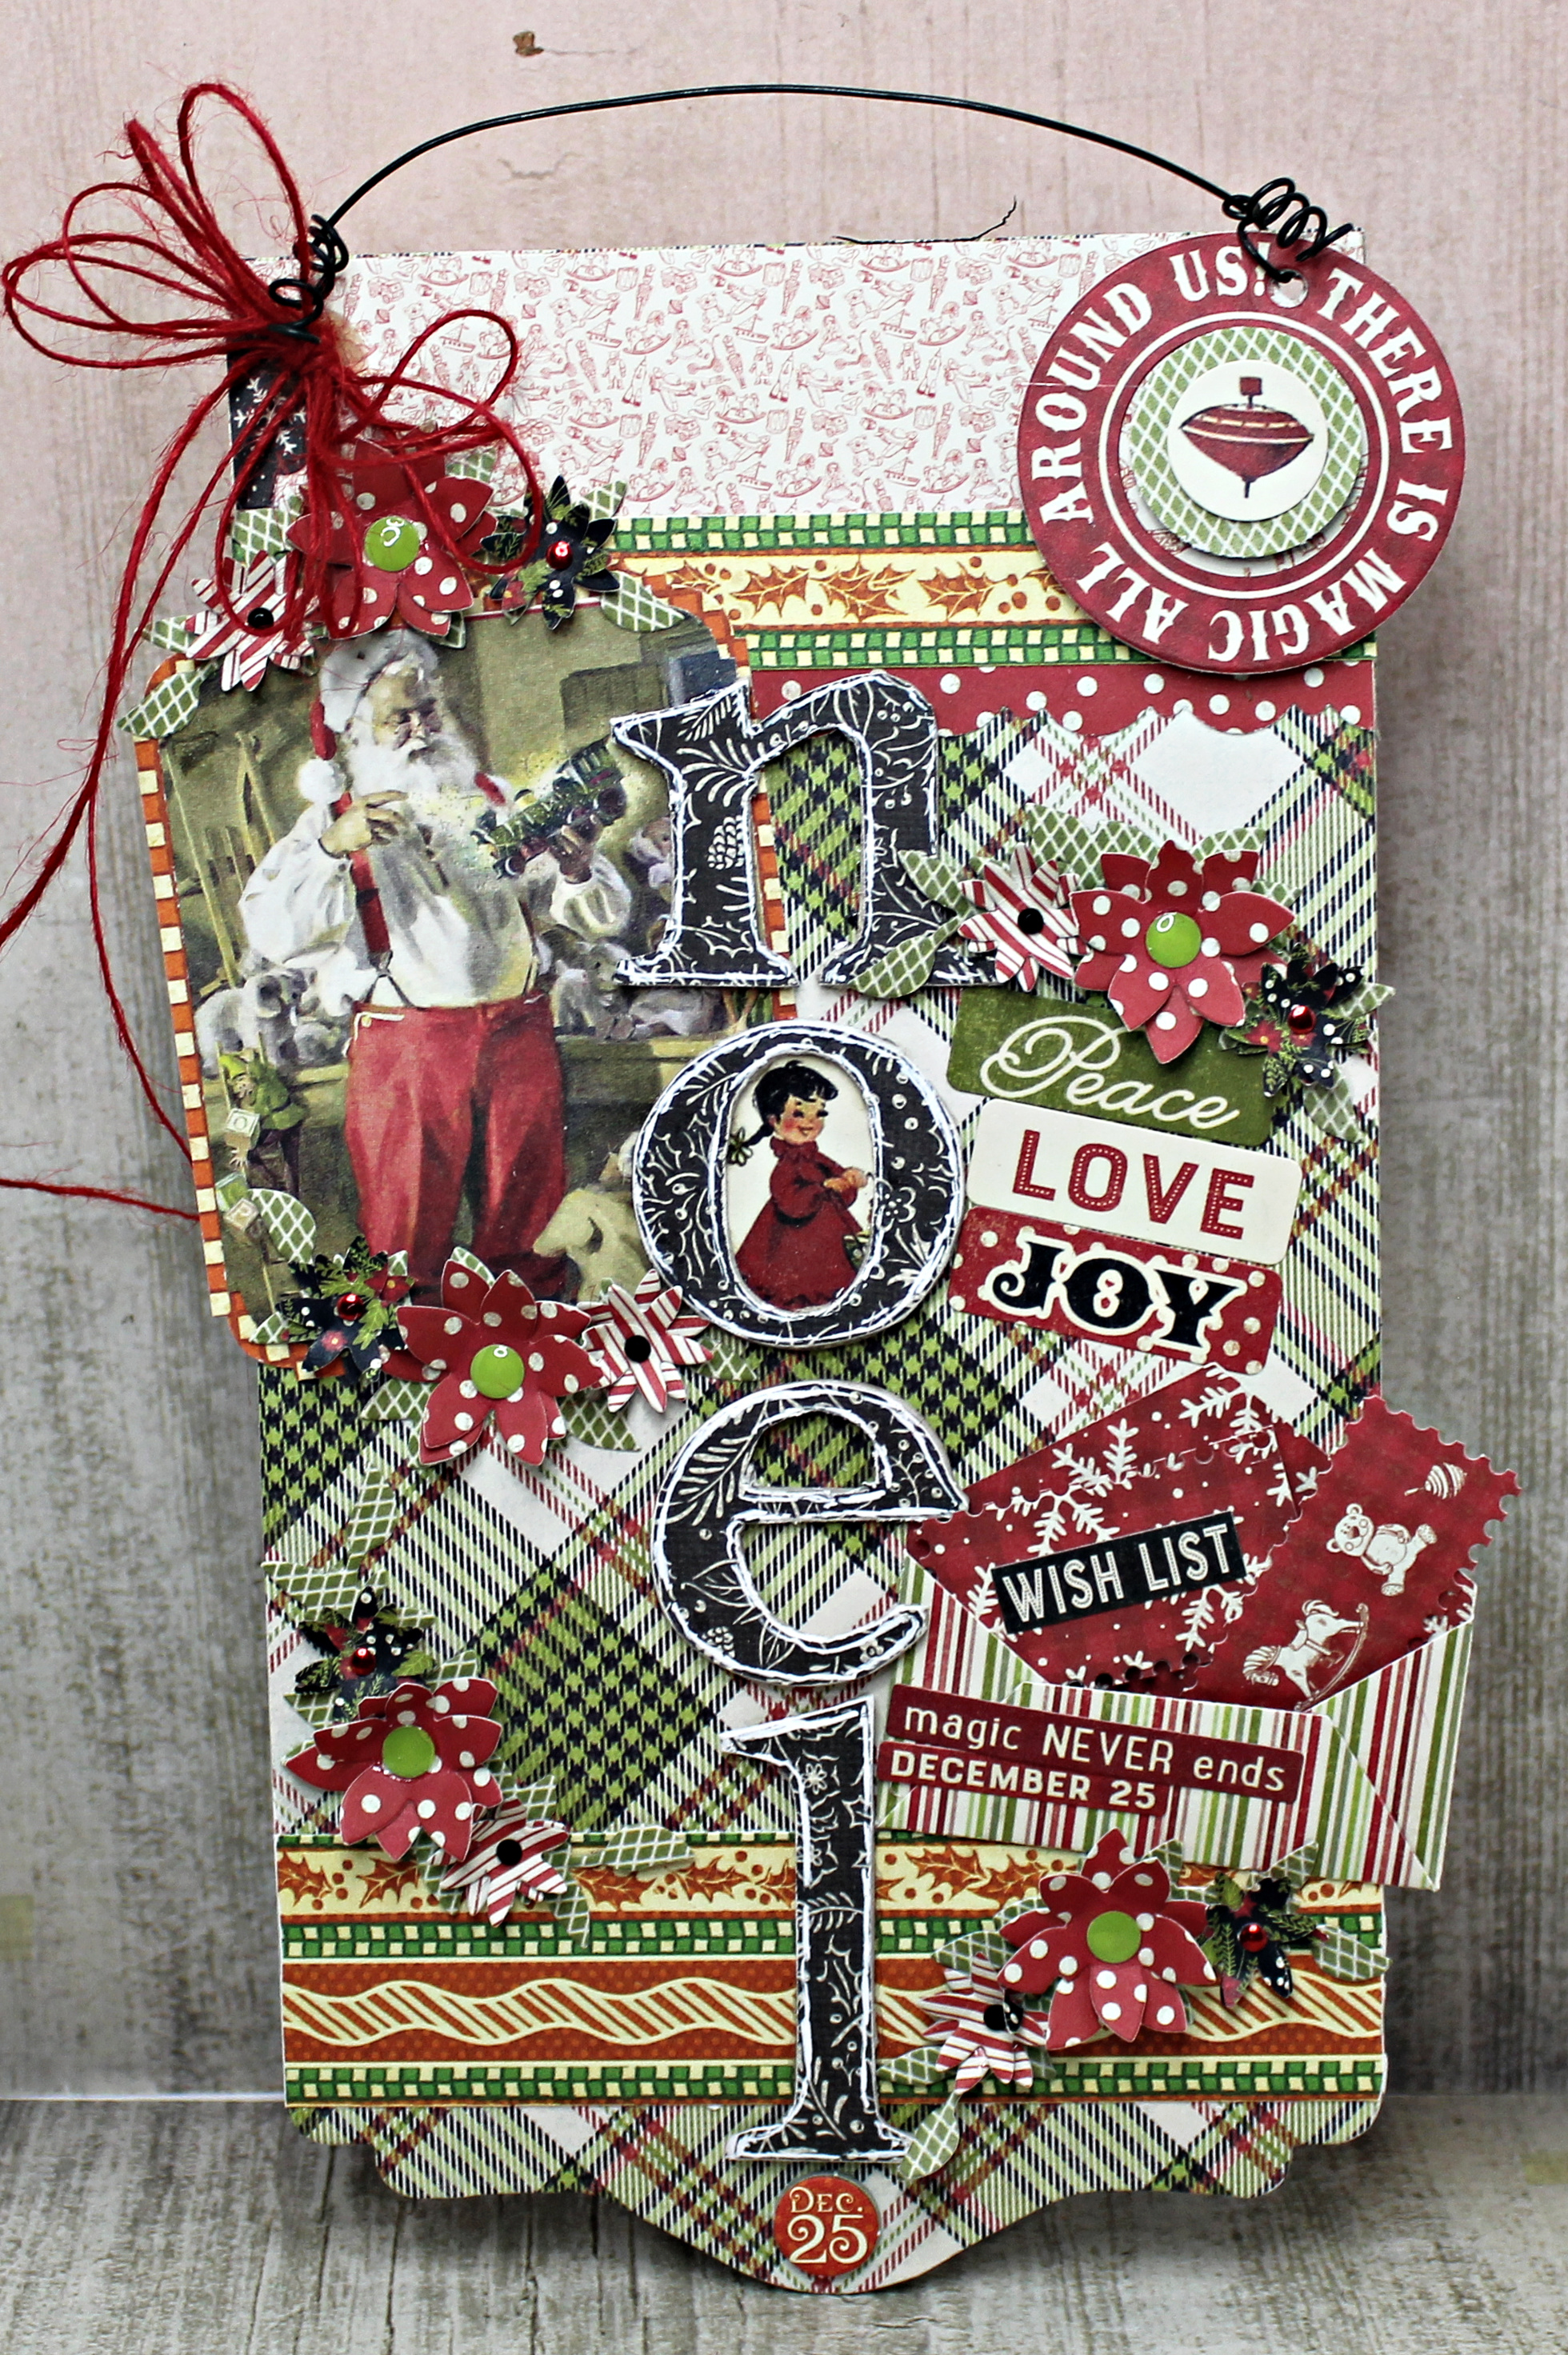
Die cut one cover of the Field Notes and Specimen; cover with pretty pattern paper and decorate!


Add chipboard letters that have been covered with pattern paper; line work done with white pen. 
Add twine bow to wire hanger. 


Add flowers using Everyday Tag and Labels here and there on prepared piece. 
Add wire hanger to top of prepared home decor piece. 


Add a pretty bow and extra ephemera from the paper kit. 


Die cut an envelope from Envelope Folder and Flowers; place a few fun surprises in it. 


Hope you enjoy creating home decor pieces for gifts or for your own home. 
Enjoy Pam


This is our fourth annual Comfort & Joy event which started during the pandemic as a way to stay connected throughout the holidays even though we were separated from family and friends. Now it's an Eileen Hull Fan Club tradition!
The team will be creating with holidays recipes in mind- "recipes" can include anything- actual baked goods, journals, banners, tags, cards, home decor, gift wrap and gifts to give and sell. Please make sure to share your "recipes" in the Comfort & Joy 23 photo album in the fan club- there will be prizes! We hope that you enjoy this event and look forward to seeing what we all create this holiday season!

Supplies:
Sizzix Mat Board
Graphic 45 Christmas Paper
Chipboard Letters
Signo White Pen
Pop Dots Xyron Creative Station and Permanent Adhesive
Wire Hanger
Ribbon

DISCLAIMERS
This blog is compensated to provide opinion on products, services, websites, and various other topics. Even though the owner(s) of this blog receives compensation for our posts or advertisements. I always give my honest opinions, findings, beliefs, or experiences on those topics or products. The views and opinions expressed on this blog are purely my own. Any product claim, statistic, quote or other representation about a product or service should be verified with each manufacturer, provider, or party in question/This blog contains affiliate links, clicking and shopping through these links helps to support and run Pam Bray Designs - Scrapbook Flair Blog at no additional cost to you. Today's features are Eileen Hull Designs and Sizzix. 

Thursday, November 16, 2023

Comfort and Joy Advent Calendar with Eileen Hull Designs


Comfort and Joy!!!
Advent Calendar!!!
It is never too early to start planning special projects and activities for advent! 
I hope you enjoy this year Advent Calendar that I created using. Eileen Hull Designs Field Notes and SpecimenEnvelope Folder and Flowers Thinlit Dies and Sunflower Die #666045 using 

Begin by cutting 4 of the Field Notes and Specimen from chipboard, cover with red card stock. 
Lay two prepared pieces upside down add a piece of white card stock to back to hold them in place. 
Sand edges with sand block. 
Die cut two of binds using Full Size Journal bind. Cover with red card stock. Adhere prepared back to prepared side pieces to form advent box. 
(HINT: Add small brads to Advent box before decorating inside. This should be done prior to decorating outside of Advent Box)


Cut 24 small envelopes using Envelope Folder and Flowers Thinlit Die.
Form envelopes. 


Punch border strips from pattern paper; add to each side of bind. 
Add 5 prepared envelopes to inside left part of Advent Box. 


Apply rub on to inside of Advent Box. 


Decorate with Ephemera inside. 
Add small strip of pattern paper to inside of bind to create a uniform look. 


Continue adding prepared envelopes, ephemera and rubons on the back and right cover. 


Trim numbers ticket to size; add to top of envelope. 
Make sure to leave room for invisible Velcro pieces. 


Add Velcro pieces to each envelope to create an easy way to open each envelope. 
Fill each gift card with special Bible verses, small gift items, candy etc. 


Use a large Ephemera piece for Day 25. 
Add to right inside cover with pop dots. 


Add tag to inside of Ephemera piece. 
Great place to add a hidden gift card. 


Adhere pattern paper to outside covers. 


Use label for enclosure. 
Add a holiday rub-on to inside part of label. 
Adhere doily ephemera to cover before adding prepared label.  


(HINT: Add small brads to Advent box before decorating inside. This should be done prior to decorating outside of Advent Box)
Add Ephemera to front of box. 


Die cut flowers using Sunflower Die; layer together. 
Add to front of Advent Box. 
Die cut and add leaves from Festive Gatherings
Add small metals to inside of flowers. 
Add bow. 


This is a super easy Advent Calendar and hope you give it a try this Advent Season. 
Enjoy Pam

Supplies:
Sizzix Mixed Media Christmas #661602
Natural Twine and Jute
Metals
3/4 and 1/2 Circle Punch
Diamond Lace Border Punch
Invisible Velcro


 2023 Comfort and Joy 

The team has been creating fun projects all month long! I hope you have enjoyed following along with projects being shared in Eileen's Fan Club or on her blog. (Link below)
There were recipes for baked goods, journals, banners, tags, cards, home decor, gift wrap and gifts to give and sell. We hope that you enjoy this event and look forward to seeing what we all create this holiday season! Please join us over at Eileen's Fan Club!!!!

DISCLAIMERS
This blog is compensated to provide opinion on products, services, websites, and various other topics. Even though the owner(s) of this blog receives compensation for our posts or advertisements. I always give my honest opinions, findings, beliefs, or experiences on those topics or products. The views and opinions expressed on this blog are purely my own. Any product claim, statistic, quote or other representation about a product or service should be verified with each manufacturer, provider, or party in question/This blog contains affiliate links, clicking and shopping through these links helps to support and run Pam Bray Designs - Scrapbook Flair Blog at no additional cost to you. Today's features are Eileen Hull Designs and Sizzix. 


Friday, November 10, 2023

Happy Fall Card


Happy Fall!!!


Adhere pattern paper and embossed cream paper to top of card base. Tear piece of cardboard to fit on part of card front; remove bits and pieces of cardboard off front. Ink front with white ink. Adhere to top of card Spatter with distress ink; dry. Lay stencil on top of card front; apply distress randomly over stencil using distress ink with stencil brush. Die cut leave from pattern paper; adhere to lighter color paper. Cut around leaves; add to cardboard front.


Stamp sentiment on cardstock; add die cut “happy” to top of card stock. Add border to top of sentiment piece. Add to top of card. Die cut scribble piece; add to card. Add just to bottom of leaves Add gemstones. 

Supplies
Sizzix 666559 Leaf Fragment Thinlit Dies
Sizzix 660957 Halloween Words Script Thinlit Dies
Sizzix 660222 Scribbles and Spat Thinlit Dies
Dare2Be Artzy Everything Blooming
Creative Expressions Twill Weave Embossing Folder
Blank Page Muse Fall Collection 2 Stamp Set
White Ink
Distress Inks
Cardboard
Jute
Amber Gemstones
5" x 6 1/2" Card Base


Sunday, November 5, 2023

A Cozy Fall Harvest Digital Paper Collection


I am so excited to share that I have started creating Digital Paper Collections with Blank Page Muse which you can find


Here are a few cards using Cozy Fall Harvest to help inspire you.


Let's Get Cozy Card!


Hello Card!


Thanks Card!


The details... digital download kit features: 4 zip digital files  8 1/2 " x 11" assorted papers, ephemera. No physical papers this is for you to print at home. 300 dpi PNG files.  The files should print on 8 1/2" by 11" paper. Colors may vary from what you see on your screen, that is normal and varies due to screen brightness, printer types etc. Glitter and metallic effects show on screen different than they may print at home. Use these digital designs for your card making, junk journal pages, scrapbook pages and more. No physical items will be shipped to you. 


Pumpkin Kisses and Harvest Wishes Layout

The digital products are compressed in 4 zip files that should be fairly straightforward to open.

Kit includes: 9 digital printable pages of designer papers and 2 digital printable pages of ephemera.

ENJOY  PAM

Wednesday, November 1, 2023

Comfort and Joy - Let There Be Peace Chipboard Album with Eileen Hull Inspiration Team


Join us in our 2023 Comfort and Joy for all of November. 
This is our fourth annual Comfort & Joy event which started during the pandemic as a way to stay connected throughout the holidays even though we were separated from family and friends. Now it's an Eileen Hull Fan Club tradition!
The team will be creating with holidays recipes in mind- "recipes" can include anything- actual baked goods, journals, banners, tags, cards, home decor, gift wrap and gifts to give and sell. Please make sure to share your "recipes" in the Comfort & Joy 23 photo album in the fan club- there will be prizes! We hope that you enjoy this event and look forward to seeing what we all create this holiday season!


Happy November!!! 
Are you excited for the holidays!!! 
All month-long Eileen Hull's will be sharing recipes...but not all are food recipes, lol! 
There will be technique recipes, inspirational recipes, so much more! 

I created a Let There Be Peace Chipboard Album using Eileen's Field Notes and Specimen #666475

Technique Recipe
Step 1
Begin by cutting pages using die. Keeping all three of the hole bind that are on the binding. 
Your next page you will cut off one of the 1/4" bind with holes off. 
Repeat for pages 3 and 4. 
Continue shortening the pages 1/4" until you get the number of pages stagger that you want. 
Die cut pattern paper; adhere to front and back of each piece. 
(Remember to punch your holes out as you finish each layer)


Step 2
Decorate your pages using pattern paper, ephemera, scraps of paper, etc along with the frame from the  Field Notes and Specimen #666475.


Page 2 Back

Step 3
Die cut and add Mini Slimline and Tickets page. 
Decorate page. 


Step 4
Die cut filed notes and cut down to cover the bind on page. 
Add ephemera, pattern paper mats along with leaves from one of Eileen's older dies. 


Step 5
Decorate with large mats and ephemera. 


Step 6
Decorate with pattern papers, Ephemera, 
Die cut Everyday Tag and Labels #666533 out, emboss using the Key Embossing Folder
Apply Rose Gold Luster Wax to top. 
Add to page with pop dots.


Step 7
Decorate with pattern papers, Ephemera and Mandala Die 665587
Die cut Everyday Tag and Labels #666533 out, emboss using the Key Embossing Folder
Apply Rose Gold Luster Wax to top. 
Add to page with pop dots.


Step 8
Decorate with pattern papers, Ephemera, Mandala Die Cut and Mini Slimline and Tickets Die Cut. 


Step 9
Die cuField Notes and Specimen, turn on its side, cut to measure the width of the pages. 
Apply pattern paper and add holes to side of page. 
Decorate with pattern papers, Ephemera, Mandala Die Cut and Mini Slimline and Tickets Die Cut. 


Step 10
Decorate page with pattern paper, ephemera and die cuts using the Library Pocket, ATC Cards & Tabs and flower and leaves from the Starlit Village Dies. 


Step 11
Decorate page with pattern paper, ephemera, pocket and die cuts using the Library Pocket, ATC Cards & Tabs


Step 12
Emboss brown card stock using the Key Embossing Folder.
 Decorate with pattern papers and Ephemera, 
Add twine bow. 
Add to page with pop dots.

Step 13
Emboss brown card stock using the Key Embossing Folder.
 Decorate with pattern papers and Ephemera, 
Add twine bow. 
Add to page with pop dots.

When done use your Let There Be Peace Chipboard Album for photos, fun recipes or do what we do with recipes,... MIX IT UP and do a bit of each. 
Enjoy Pam!!!!

Recipe Supply List
Eileen Hull Designs/Sizzix Mandala Die 665587
Red and Brown Card Stock
Twine
2 Large Rings
Scallop Border Punch
Gemstones and Enamel Dots 
Pop Dots
Adhesive
Xyron Creative Station with Permanent Adhesive


Christmas is always busy making some of our favorite cookies and candies. 
We used to make 10-12 different cookies and 6 or so in candies to be delivered to our neighbors and friends but as the years have passed.
As the years have passed our kids have grown and moved to their own homes in different states so we know longer bake as many cookies as possible.  
BUT...
We still always manage to bake Grandma Van Dusen Peanut Butter Cookies which is our family's favorite cookie! 

 Recipe:
2 1/2 C. flour
1/2 t. baking soda
1 t. baking powder
1c. soften margarine.
2 eggs, slightly beaten.
1 c. sugar
1 c. brown sugar
1 c. Jiffy Peanut Butter
2 t. vanilla

*Cream margarine, sugars, eggs, vanilla together
*Add peanut butter
*Stir in dry ingredients
*Roll into balls
*Flatten with fork - HINT: Dip fork in a cup of water will keep fork from sticking to batter
*Bake at 350 degrees for 8-9 minutes
*Cool 1 to 2 minutes on cookie sheet to finish cooking.

This recipe is wonderful to make thumbprint cookies using Candy Kisses.
Enjoy Pam

DISCLAIMERS
This blog is compensated to provide opinion on products, services, websites, and various other topics. Even though the owner(s) of this blog receives compensation for our posts or advertisements. I always give my honest opinions, findings, beliefs, or experiences on those topics or products. The views and opinions expressed on this blog are purely my own. Any product claim, statistic, quote or other representation about a product or service should be verified with each manufacturer, provider, or party in question/This blog contains affiliate links, clicking and shopping through these links helps to support and run Pam Bray Designs - Scrapbook Flair Blog at no additional cost to you. Today's features are Eileen Hull Designs and Sizzix.