Monday, November 22, 2021

Quick and Easy Holiday Embossed Kraft Sacks with Xyron


Happy Thanksgiving Week to all my Xyron Fans!!!
One of our family traditions is giving our family members and friends a special Christmas Ornament for their Christmas Tree. 
I am sharing small Kraft Sacks I decorated; could you believe I couldn't find any sacks this year to place my ornaments in. SIGH!!!
BUT...
XYRON TO THE RESCUE! 


I grabbed some small Kraft Sacks that I found at the local craft store along with pretty pattern paper and Xyron Adhesive! 
Begin by covering each bag with assortments of cuts from pattern paper. 

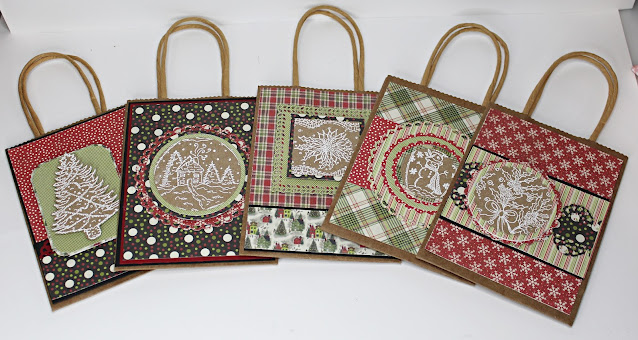
Stamp different ornament images on Kraft paper using VersaMark ink and Glacier White Embossing Powder. Die cut or fussy cut images to fit the bags. Adhere using Xyron Adhesive!


Stamp ornaments a second time and emboss; fuss cut to create tags. 


I hope you are inspired to create you holiday gift sacks throughout the year using your favorite Xyron Adhesive! Enjoy Pam

Supplies:
Kraft, Red, Back Card Stock
Natural Twine
4" x 5 1/4" Craft Sacks with Handles
Authentique Magical Christmas Pattern Paper
Circle and Square Nesting Dies
Border Punches

DISCLAIMERS
This blog is compensated to provide opinion on products, services, websites, and various other topics. Even though the owner(s) of this blog receives compensation for our posts or advertisements. I always give my honest opinions, findings, beliefs, or experiences on those topics or products. The views and opinions expressed on this blog are purely my own. Any product claim, statistic, quote or other representation about a product or service should be verified with each manufacturer, provider, or party in question/This blog contains affiliate links, clicking and shopping through these links helps to support and run Pam Bray Designs - Scrapbook Flair Blog at no additional cost to you. Today's features are Xyron Products.


Friday, November 19, 2021

Hello Cold Days Slimline Card


Hello! Cold Days are coming! 
Are you ready?
I am sharing a fun slim line card I created with two of my gnome stamps sets from Blank Page Muse! 


Begin by creating background paper using both the trees, holly leaves and stars from the  Starburst Gnome Stamp Set and Madam Holiday Stamp Sets. Stamp images using Memento Inks on white paper.
Lay Spinning Circle Stencil on stamped background paper; apply light green ink to top of stencil using blending tool. 


Adhere pattern paper and red card stock to front of slimline card base using Xyron Mega Tape Runner with Permanent Adhesive
Die cut prepared stamped background paper with Deckle Slimline Die; adhere to front of card with Xyron Mega Tape Runner with Permanent Adhesive.


Die cut scallop circle and pattern paper circle out; adhere together. 
Place on card front with pop dots. 


Stamp and color gnomes from the stamp set on white card stock. 
Fussy cut out; add to front of card with pop dots. 


Add red gemstones to gnomes' hats and front of shirt. 
Stamp sentiment using black ink on white card stock; adhere to green card stock and pattern paper. 
Add to front of card with pop dots. 


Stamp and color holly images on white card stock; fussy cut out. 
Adhere to front of card. 
Add Glossy Accent to holly berries. 
I hope you stop by the Blank Page Muse Store and check out all the fabulous gnome sets along with my latest release... HERE!!!!
Enjoy Pam

Supplies 
Whtie, Red, and Green Card Stock
Ranger Glossy Accents
Pattern Paper
Diamond Press Slimline Deckle and Scallop Circle Dies
3 1/2" x 8 1/2" Cream Card Base
Markers
Blending Tools
Red Gemstones

All my products are available in the Blank Page Muse Shop

All my products available in the Emerald Creek Craft Supplies Shop

DISCLAIMERS
This blog is compensated to provide opinion on products, services, websites, and various other topics. Even though the owner(s) of this blog receives compensation for our posts or advertisements. I always give my honest opinions, findings, beliefs, or experiences on those topics or products. The views and opinions expressed on this blog are purely my own. Any product claim, statistic, quote or other representation about a product or service should be verified with each manufacturer, provider, or party in question/This blog contains affiliate links, clicking and shopping through these links helps to support and run Pam Bray Designs - Scrapbook Flair Blog at no additional cost to you. Today's features are Pam Bray Designs and Blank Page Muse and Emerald Creek Craft Supplies. 

Wednesday, November 17, 2021

Gone Fishing with Eileen Hull Designs Inspiration Team

Hello everyone!!!
Are you enjoying all the fabulous projects that Eileen Hull Designs Inspiration Team has been sharing all month long!
The theme is "Seasonal Makes"!
What better project to create but a Vintage Truck Die using some fun gnomes going fishing!
You know its that time of year...cool air, nice to be outside and of course fishing!


Begin by die cutting the Vintage Truck Die using mat board. 
HINT: I like covering the front and back of mat board with pattern paper using my Xyron Creative Station prior to cutting. 
Use Blank Page Muse Tattered and Worn Paper Collection to get that real grungy and vintage feel for your truck. 
Adhere thin natural twine around edges using Xyron Mini Hot Glue Gun to give your Vintage Truck a more finished look. 


Add small piece of the binding from the Passport Die to enclose the front to the prepared Vintage Truck .


Add fun holiday gnome and fishing bits to inside of truck. 


Place fall foliage in bed of truck. 
Create a small sign using the Blank Page Muse Tattered and Worn Paper Collection and piece of bind from the Passport Die


CLOSER LOOK INSIDE OF FINISHED GONE FISHING VINTAGE TRUCK

I hope you are inspired to create a few Vintage Trucks using Eileen Hull Design Dies from Sizzix throughout the year!  
Enjoy Pam

Are you a member of the Eileen Hull Fan Club? Find Eileen Hull Facebook Lives at Eileen Hull Designs on Tuesdays at 6:00 Eastern and Thursdays at 4:00 to for project ideas, techniques, inspiration and creative community. 

FOLLOW: Eileen on FacebookInstagramYouTube and Pinterest..

Supplies:
Bits and Pieces from Local Craft Store
Micron .1 Black Marker
Natural Twine

DISCLAIMERS
This blog is compensated to provide opinion on products, services, websites, and various other topics. Even though the owner(s) of this blog receives compensation for our posts or advertisements. I always give my honest opinions, findings, beliefs, or experiences on those topics or products. The views and opinions expressed on this blog are purely my own. Any product claim, statistic, quote or other representation about a product or service should be verified with each manufacturer, provider, or party in question/This blog contains affiliate links, clicking and shopping through these links helps to support and run Pam Bray Designs - Scrapbook Flair Blog at no additional cost to you. Today's features are Eileen Hull Designs/Sizzix Products.

Monday, November 15, 2021

Grateful Holiday Set with Xyron


Hello, what are you "grateful" for today, this week, month, year! 
Friends, family, home... for me it is all of the above plus to be able to work in the crafting industry, working with amazing products like Xyron's. 


To create Grateful Holiday Set
Photo 1: Run matboard through Xyron Creative Station with Permanent Adhesive.
Photo 2: Add paper to adhesive side; turn matboard over and repeat. Die cut prepared pieces out using 
Photo 3: Run strips of smaller paper through Xyron 3" Disposable Sticker Maker; adhere to inside of prepared notebook. 
Photo 4: Cover small note book with pattern paper; glue to inside cover using Xyron Mini Glue Gun with Glue Sticks
Photo 5: Adhere border strips to cover using Xyron Mega Tape Runner with Permanent Adhesive prior to doing Photo 4. 


Photo 6: Cover matboard with pattern paper using Xyron Creative Station with Permanent Adhesive; die cut oval frame from Sizzix Deco Frames Dies.
Take oval and adhere to inside cover with Xyron Mini Glue Gun with Glue Sticks.
Add Ephemera piece to oval. 
Photo 7: Adhere small paper pieces using Xyron Mega Tape Runner with Permanent Adhesive


Run small paper doily through Xyron 3" Disposable Sticker Maker.
Add second part of prepared frame to top Ephemera; place on notebook with pop dots. 


Glue Twine bow and flowers using Xyron Mini Glue Gun with Glue Sticks.


Add small closure and metal bit to prepared notebook using Xyron Mini Glue Gun with Glue Sticks.


Create a matching place card using Sizzix Place Cards Die to complete Grateful Holiday Set! 
Shop for your favorite Xyron products
Enjoy! Pam

Supplies:
Sizzix Matboard
Authentique Fall Ephemera
Prima Flowers
Yellow Twine
Small Metal Bit

DISCLAIMERS
This blog is compensated to provide opinion on products, services, websites, and various other topics. Even though the owner(s) of this blog receives compensation for our posts or advertisements. I always give my honest opinions, findings, beliefs, or experiences on those topics or products. The views and opinions expressed on this blog are purely my own. Any product claim, statistic, quote or other representation about a product or service should be verified with each manufacturer, provider, or party in question/This blog contains affiliate links, clicking and shopping through these links helps to support and run Pam Bray Designs - Scrapbook Flair Blog at no additional cost to you. Today's features are Xyron Products.


Thursday, November 11, 2021

Thanks Card for our Veterans


November 11th...a day of Thanksgiving to all of our veterans! 
I am so proud of the men and women that serve and have served in our Armed Services!
Such a great sacrifice not only to them or to us BUT to their families! 
The family serves as much as the veteran in so many areas! 
THANK YOU!

Today I am sharing a Thanks Card I created. 
This is a way to promote the Pam Bray Designs Brand but also to celebrate all the freedoms we have because of those that have served!


Adhere black and grey card stock to the front of a 5" x 6 1/2" card base. 


Die cut Sizzix Mixed Media #660220 at on corner of the pour pattern paper from the Tattered and Worn Paper Pack.


Stamp Thanks sentiment from Blank Page Muse Fall Collection 1 Stamp Set  on to white card stock using blank ink; adhere to pattern paper and black card stock. 
Add to front of card with pop dots. 
Stamp flowers from Blank Page Muse Sympathy Flower and Sentiment Stamp Set on Tattered and Worn Pattern Paper using blank ink; fussy cut out. 
Highlight petals and centers with markers. 
Add to card front. 
Add Golden Bead Gel to center of flowers.
Add twine bow. 
Enjoy and again let's always celebrate our Veterans! 
Pam


Supplies:
Golden Acrylic Bead Gel
Yellow and Green Markers
Black, White and Grey Card Stock
5" x 6 1/2" Cream Card Base
Green Twine
Pop Dots


All products are available in the Blank Page Muse Shop
Make sure to checkout all of the newest releases!!! 
So much to choose from!

Please make sure to tag me as Pammejo Bray on Facebook.
Follow my Blog! 


DISCLAIMERS
This blog is compensated to provide opinion on products, services, websites, and various other topics. Even though the owner(s) of this blog receives compensation for our posts or advertisements. I always give my honest opinions, findings, beliefs, or experiences on those topics or products. The views and opinions expressed on this blog are purely my own. Any product claim, statistic, quote or other representation about a product or service should be verified with each manufacturer, provider, or party in question/This blog contains affiliate links, clicking and shopping through these links helps to support and run Pam Bray Designs - Scrapbook Flair Blog at no additional cost to you. Today's features are Pam Bray Designs and Blank Page Muse.


Wednesday, November 10, 2021

Smile! Its Sweet Passion Day with Blank Page Muse


Smile my sweet friends!
I am sharing my second paper collection...  "SWEET PASSION". 
It is the second of three paper collection from Blank Page Muse and was released last week at the Scrapbook Expo in Ontario, CA!
It's a fabulous mixed media looks in pink and purple; so the inky mess is done for you!
SO LOVE!!!

Let's create a SMILE CARD
Begin by adhering black card stock and adhere to a 5" x 6 1/2" card base. 
Adhere Sweet Passion pattern paper to front of card. 
Lay Bedazzled Diamond Stencil on top of card front; apply modeling paste with palette knife. Dry
Cut border strip and stamp "Smile" from the  Happy Day Llama Stamp Set to strip with blank ink. 
Adhere prepared border to black strip; adhere to front of card. 


Stamp sunflowers from Fall Collection Stamp Set 2 twice on plaid paper from the Sweet Passion  using black ink. Fussy cut out. 
Add to front of card front with pop dots; color center of flowers with marker. 
Add twine bow.

Super easy to create cards using Blank Page Muse products along with my new paper collections! Best thing is FREE SHIPPING over $49.00 in the US.
 Enjoy Pam

SUPPLIES
DecoArt Modeling Paste
Palette Knife
Purple Twine
Green Marker
Black Ink
5" x 6 1/2" Card Base

All products are available in the Blank Page Muse Shop
Make sure to checkout all of the newest releases!!! 
So much to choose from!

Please make sure to tag me as Pammejo Bray on Facebook.
Follow my Blog! 


DISCLAIMERS
This blog is compensated to provide opinion on products, services, websites, and various other topics. Even though the owner(s) of this blog receives compensation for our posts or advertisements. I always give my honest opinions, findings, beliefs, or experiences on those topics or products. The views and opinions expressed on this blog are purely my own. Any product claim, statistic, quote or other representation about a product or service should be verified with each manufacturer, provider, or party in question/This blog contains affiliate links, clicking and shopping through these links helps to support and run Pam Bray Designs - Scrapbook Flair Blog at no additional cost to you. Today's features are Pam Bray Designs and Blank Page Muse. 


Saturday, November 6, 2021

Hello Friend Slimline Card


Hello Friends!!!
I am still over the moon excited with the releases of my latest paper collections!
MIXED MEDIA PAPERS!!!
Have you seen them yet?
Here's a fun slimline card created with the Cyan Consortium Mixed Media Paper Pack.

LET'S BEGIN!!!

Create a slimline card to measure 3 1/2" x 8 1/2"; adhere blue card stock to top. 
Die cut white card stock using Kat Scrappiness Wonky Stitched Nesting Slimline Dies; adhere to top of card front. 
Stamp sentiment to front of card front with black ink. 
Die cut pieces of the Cyan Consortium Mixed Media Paper using Sizzix Leaf Fragment Thinlit Die Set . Add die cut leaves to top of card front using Xyron Mega Runner with Permanent Adhesive and pop dots. 
Add bow to top of leaves with Xyron Mini Glue Sticks


SUPPLIES:
White and Blue Card Stock
Blue Ribbon

I hope you are inspired to grab a few products from Blank Page Muse along with the some of the new products. Best thing is FREE SHIPPING over $49.00 in the US. 
Enjoy Pam

All products are available in the Blank Page Muse Shop
Make sure to checkout all of the newest releases!!! 
So much to choose from!

Please make sure to tag me as Pammejo Bray on Facebook.
Follow my Blog! 


DISCLAIMERS
This blog is compensated to provide opinion on products, services, websites, and various other topics. Even though the owner(s) of this blog receives compensation for our posts or advertisements. I always give my honest opinions, findings, beliefs, or experiences on those topics or products. The views and opinions expressed on this blog are purely my own. Any product claim, statistic, quote or other representation about a product or service should be verified with each manufacturer, provider, or party in question/This blog contains affiliate links, clicking and shopping through these links helps to support and run Pam Bray Designs - Scrapbook Flair Blog at no additional cost to you. Today's features are Pam Bray Designs and Blank Page Muse.