Showing posts with label Lace Embossing Folder. Show all posts

Tuesday, July 8, 2025

Yankee Doodle Banner


Happy July!!!
Celebrated Memorial Day!!!
We just celebrated the Fourth of July!!!
Looking toward to Labor Day!!!
What better way to celebrate all summer long but with a fun "Americana" Banner using Eileen's latest dies and Lace 3D Embossing Folder! 


Begin by covering Sizzix Matboard with pattern paper; die cut out using the Handbound Journal Die


Emboss each prepared piece using Eileen's Lace Embossing Folder
Sand lightly with sanding block. 


Add scallop and border strips to prepared pieces to cover holes. 


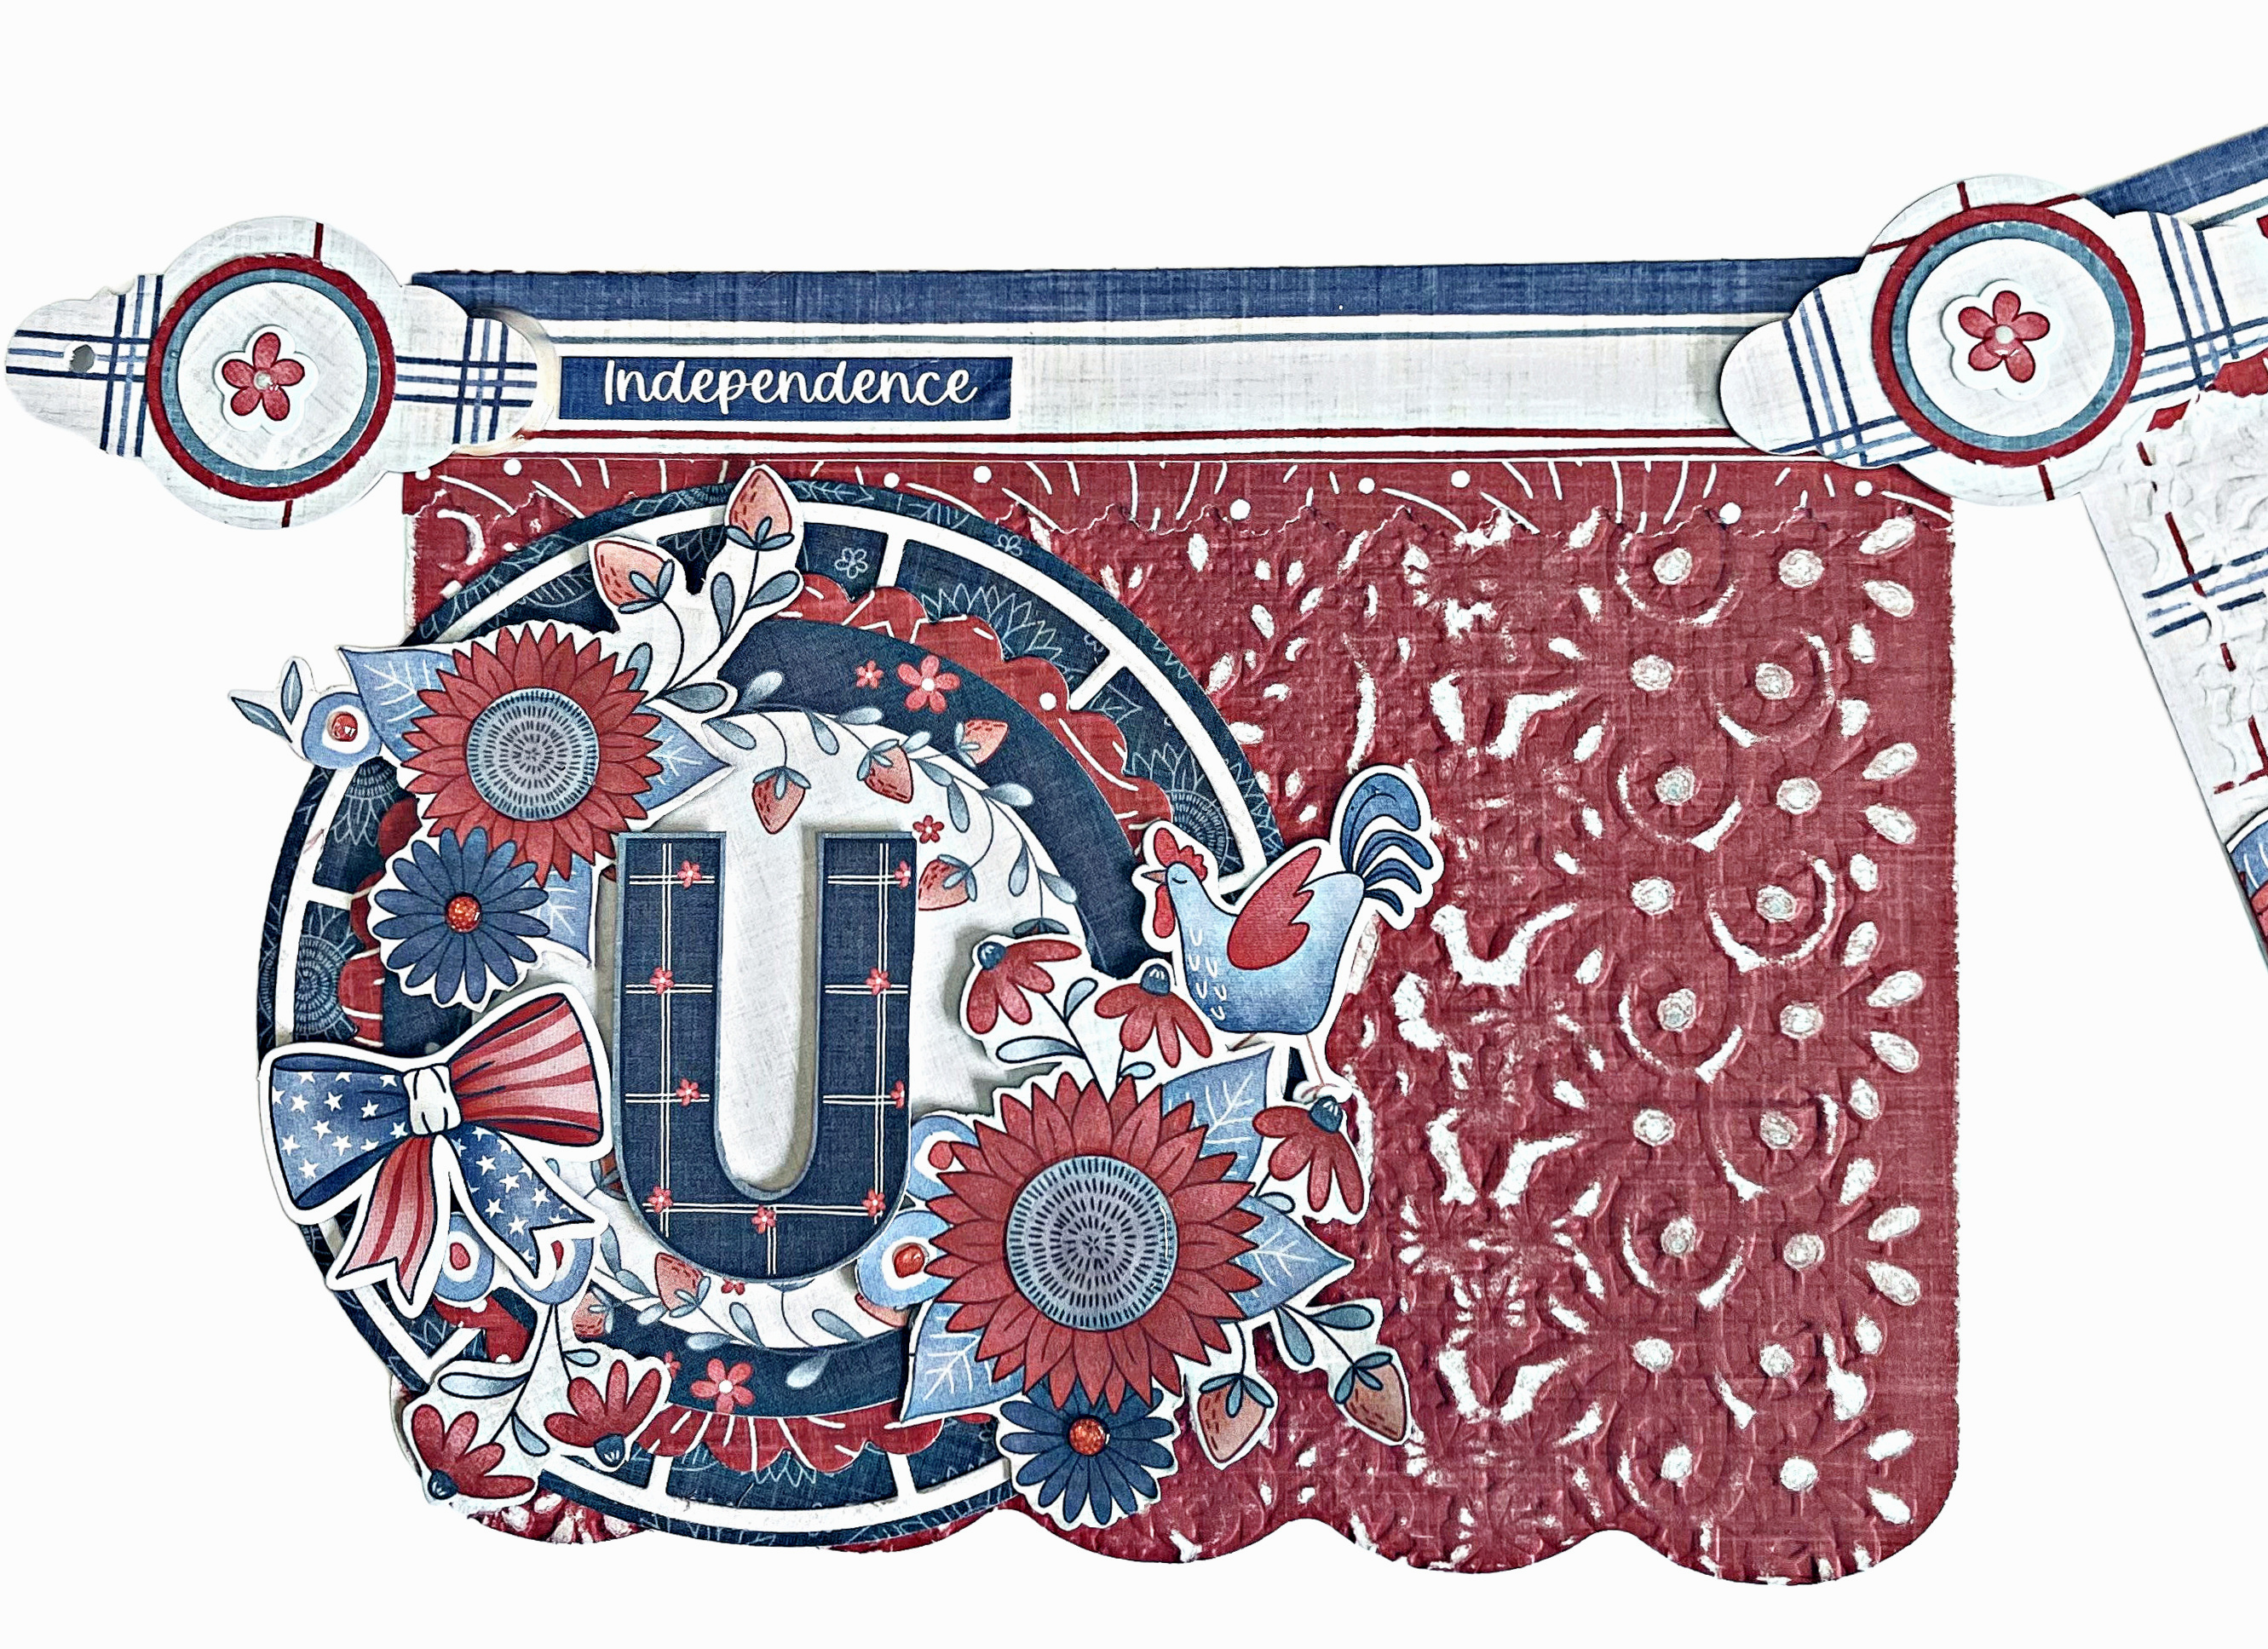
Decorate each panel with chipboard letters die cuts and Ephemera using the pattern paper. 


For each panel cut and layer pieces from Rainbow Wheel Die.
Creating fun layers and unique wheels for each panel. 
Fussy cut elements from pattern paper; add to front of panel. 


Cover chipboard letters with pattern paper; add to center of wheels. 


Cover scrap of matboard with pattern paper; die cut using Journal Hardware Die
Add to front of panel. 
Fussy cut elements from pattern paper; add to front of panel. 

Die cut arrow; add to wheel with brad. 


Anywhere on the panels that you see a circle. ie flowers, wheels, etc.
Add Glossy Accent. dry completely before putting banner together. 


Cover scraps of chipboard with pattern paper. 
Die cut label from Journal Hardware Die
Lay banner pieces out to form banner.
Glue prepared label pieces to hold banner together using Glossy Accent. Dry completely,
Decorate with small circles layered together. 
Add sticker flowers to centers. 


Supplies
Sanding Block
3 Small Circle Punches
Scallop Border Punch
Adhesive 
Brad


DISCLAIMERS
This blog is compensated to provide opinion on products, services, websites, and various other topics. Even though the owner(s) of this blog receives compensation for our posts or advertisements. I always give my honest opinions, findings, beliefs, or experiences on those topics or products. The views and opinions expressed on this blog are purely my own. Any product claim, statistic, quote or other representation about a product or service should be verified with each manufacturer, provider, or party in question/This blog contains affiliate links, clicking and shopping through these links helps to support and run Pam Bray Designs - Scrapbook Flair Blog at no additional cost to you. Today's features are Eileen Hull Designs Products with Sizzix 

Monday, December 23, 2024

Day 23 - St Nicholas Gift Card Holder Tag


ST NICHOLAS GIFT CARD HOLDER TAG
I love putting unique and beautiful gift tags on my packages and always wish I had more time to create them 
BUT...
 it is always easy when you use fun Ephemera along with matching Christmas Papers. 
Begin by embossing and inking a scallop chipboard square. 

Add pattern paper and a piece of embossed pattern paper to top of chipboard. 

Add second piece of chipboard that has been covered with pattern paper to top along with a scallop border. 

Take a gift card lay on back side of Ephemera; add pop up strips to the sides and bottom. (Give enough room for the gift card.)

Add prepared Ephemera piece to front of tag. 

Add bits and pieces of Ephemera around prepared tag. 


Add bow.


Tuck in some thread ribbon bows under Ephemera. 


Add small flowers with enamel dots to tag. 

Make sure to tuck your gift card it. 
Add to package or give as a gift. 
Enjoy Pam

Supplies
Graphic 45 St Nicholas Collection and Tags
Chipboard Scallop and Frame
White and Red Tread                 
Red Ribbon
Small Flower Punch                 
Gold Enamel Dots
Sizzix Lace Embossing Folder

Thursday, December 5, 2024

Day 5 - North Pole Postage Tags


Happy to Day 5 of my Christmas Event...we are making tags!!!
How fun!!!
Did you know that Scrapbook.com has freebies!!!
Recently they offered Simple Stories North Pole Ephemera Pack as a freebie!!!
Now that is amazing...so I decided to use bits and lots of the pieces to create tags with! 


Begin by die cutting the premade tag using Postage Die


Emboss with the Lace Embossing Folder


Adhere prepared embossed tag to brown card stock. 


Add ephemera from the North Pole Ephemera Pack


Add ribbon, twine and small ornaments to top.
HINT: Crinkle ribbon and twine with a mist of water, crinkle up, hold with clip til dry.


Enjoy creating Christmas tags or just every day tags all year long. 
Make sure to check out Scrapbook.com for all your shopping! 
Enjoy Pam

Supplies:
Brown Card Stock
2 - Premade Stamp Tags 
Brown Ribbon
4 Small Ornaments
Natural Twine

Thursday, August 15, 2024

Tag Thursday.... Love Grows Here Mixed Media Tag

Love Grows Here!!!!
Happy Tag Thursday!
Tags are so much fun to create, 
So grab those scraps and create away!


Just use a blank tag...and emboss!
Tags have so much depth by using a favorite embossing folder and Sizzix Luster Wax!
The Luster Wax just makes those emboss pieces pop!


Then just add bits and pieces of rub-ons or your favorite background stamp with black ink to add detail. 
Then add fussy cut pieces!
Add a few with pop dots to create dimension. 

Finish with a pretty bow! 


Supplies
Graphic 45 Grow with Love Collection
8" Tag
Purple Satin Ribbon
Word Rub On

Tuesday, May 28, 2024

Everything Gets Better in Time Frame with Eileen Hull Inspiration Team


Everything gets better with time and that includes playing with Eileen Hull's Vault Dies!!!
I just love the Notebook Die!!!
I went through my blog and discovered that I have 8-10 post using the Notebook Die!
SO....
Over the next few weeks, I will randomly be doing some throwback Notebook post!


So let's begin with this fun frame created using the Notebook Die!
Begin by cutting one notebook from matboard. 


Emboss a piece of pattern paper using the Lace Embossing Folder.
Add prepared paper to the front and back of cut notebook. 
(Leave bind blank)
Using a palette knife apply tacky paste to bind and some on top of prepared of embossed paper.
Apply Bronze Anther embossing powder to top; heat set. 
(If you don't have tacky paste use Glossy Accent or something similar)


Apply Sizzix Luster Wax Ivory and Charcoal randomly on top of embossed paper. 
Add chipboard to top of notebook along with fussy cut ephemera. 


Add button to chipboard. 
Create a band using elastic ribbon.
(I stapled my ends together)
Add twine bow to top of staple


 Cut a piece of chipboard to measure 2 3/4" x 4 3/4" or a bit smaller. 
(It just needs to fit on the back inside cover. 
.Cut edge top from the Treasure Box; trim edge slightly on the flat edge so the covers will close.
Form box with washi tape
(Use the chipboard as a base to for the box around with the top edge, trim as needed) 
Cut teal paper; embossed. 
Apply luster wax to paper. 
Adhere to inside of book. and outside edges of prepared frame. 


Adhere prepared frame to inside back cover. 
Add jute around edges. 


Inside Notebook


Add a fun photo to inside front cover. 


Adhere pattern paper to back of frame and inside edges of frame. 
Create two folder paper edges to place inside of frame. 
Add fussy cut ephemera to back frame and edges. 


Add Ephemera Sentiments pieces to inside frame with pop dots. 
 

Enjoy creating fun and unique projects using Eileen's vault dies!
Enjoy Pam

DISCLAIMERS
This blog is compensated to provide opinion on products, services, websites, and various other topics. Even though the owner(s) of this blog receives compensation for our posts or advertisements. I always give my honest opinions, findings, beliefs, or experiences on those topics or products. The views and opinions expressed on this blog are purely my own. Any product claim, statistic, quote or other representation about a product or service should be verified with each manufacturer, provider, or party in question/This blog contains affiliate links, clicking and shopping through these links helps to support and run Pam Bray Designs - Scrapbook Flair Blog at no additional cost to you. Today's features are Eileen Hull Designs and Sizzix. 

Wednesday, May 1, 2024

Bloom Bright Stacking Drawer Storage with Eileen Hull Inspiration Team


"Bloom Bright" when using Eileen Hull Designs Vaulted Dies. 
Today I am sharing an easy Storage Drawer Organizer using the following Eileen Hull Designs Dies with Sizzix! 


Cut and form 8 Stacking Drawer using Matboard,
(HINT: I use Glossy Accent and clips to hold the corners together)
Ink edges with brown ink. 


Stack and glue 4 of the prepared Stacking Drawers together. 
(HINT: Use clips to hold together.)
Repeat for opposite side. 
Adhere Stacking Drawer to piece of chipboard. 
(It will keep the drawers straight and give stability.) 


Die cut two of the Field Notes from Matboard ; cut down to length that you would like for the sides of the storage box that is being created. 


Cover the outside of the prepared Stacking Drawer with pattern paper. 
(HINT: I add small pieces of paper or washi tape to give the corners added support.)


Storage box is created.
Adhere a piece of Matboard to top. 


Add pattern paper to top of prepared storage box. 


Die cut Sunflower; emboss pieces with Lace Embossing Folder.


Layer embossed pieces together. 


Emboss the top of the prepared sunflower using Sensation and Rock Candy Embossing Powder. 


Adhere prepared sunflower and embossed leaves to top of storage box. 


Add sentiment and jute bow to top along with fussy cut ephemera. 


Decorate sides of storage box 


Create a second Sunflower to one side. 


Finish storage box by adding small doorknobs to each drawer. 
Make sure to visit Eileen Hull's Blog and Fan Club...

 Supplies:

Gypsy Soul Laser Cuts D32C Frame
Stencil 
8 Small Metal Knob
Brown Ink
Diamond Press Tacky Paste
White paint
Jute

Eileen Hull's Blog

DISCLAIMERS
This blog is compensated to provide opinion on products, services, websites, and various other topics. Even though the owner(s) of this blog receives compensation for our posts or advertisements. I always give my honest opinions, findings, beliefs, or experiences on those topics or products. The views and opinions expressed on this blog are purely my own. Any product claim, statistic, quote or other representation about a product or service should be verified with each manufacturer, provider, or party in question/This blog contains affiliate links, clicking and shopping through these links helps to support and run Pam Bray Designs - Scrapbook Flair Blog at no additional cost to you. Today's features are Eileen Hull Designs and Sizzix.