Showing posts with label Box. Show all posts

Tuesday, May 20, 2025

One of My Favorite Storage Box with Eileen Hull Creative Team


ONE OF MY FAVORITE things is to create STORAGE!!!
Using the Handbound Journal Die you can do just that!
The below video will walk you through the process but it all starts with cutting two of Handbound Journal covers and binds to build a box. 


Once the Storage Box is covered with Wonderlust Explorer paper it is time to decorate. 


Add natural jute around edges of prepared storage box to create a finish look. 
Die cut one of the Rainbow Wheel Die from pattern paper; adhere together. 
Add to front of storage box. 


Decorate the front of storage box using Ephemera from the Wonderlust Explorer Collection. 
Die cut and add arrows from the Rainbow Wheel Die to storage box. 


Add small flowers, gold twine and white thread to storage box. 


Finish with labels from the Journal Hardware Die to sides of storage box along with Ephemera. 
Enjoy creating storage using your favorite Eileen Hull dies. 
Pam

Supplies:


DISCLAIMERS
This blog is compensated to provide opinion on products, services, websites, and various other topics. Even though the owner(s) of this blog receives compensation for our posts or advertisements. I always give my honest opinions, findings, beliefs, or experiences on those topics or products. The views and opinions expressed on this blog are purely my own. Any product claim, statistic, quote or other representation about a product or service should be verified with each manufacturer, provider, or party in question/This blog contains affiliate links, clicking and shopping through these links helps to support and run Pam Bray Designs - Scrapbook Flair Blog at no additional cost to you. Today's features are Eileen Hull Designs Products with Sizzix 

Wednesday, February 9, 2022

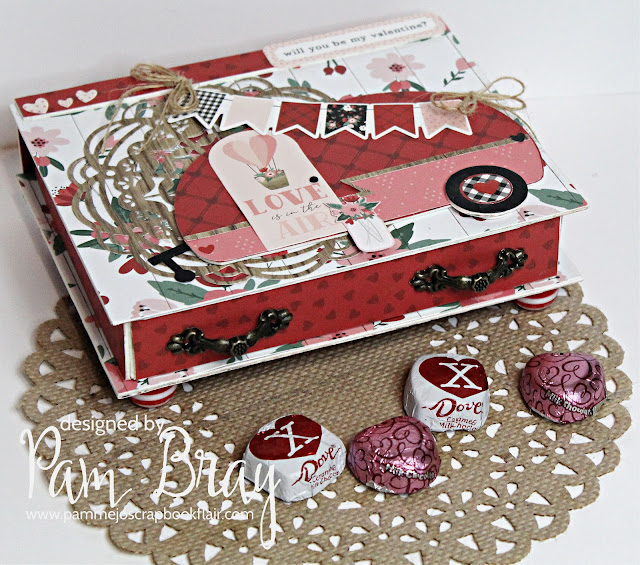
Hello Valentine Candy Box with Matching Card - Eileen Hull Designs Inspiration Team

Hello Valentine! 

Nothing says love better than chocolates in a pretty box along with a fun card.

Photo 1: Apply Xyron Creative Station with Permanent Adhesive to the front and back of mat board; add pattern paper to top of prepared mat board. 
Photo 2: Create box from prepared pieces using Xyron Mini Glue Gun and Glue Sticks
Photo 3: Add cover to top of box bind. 
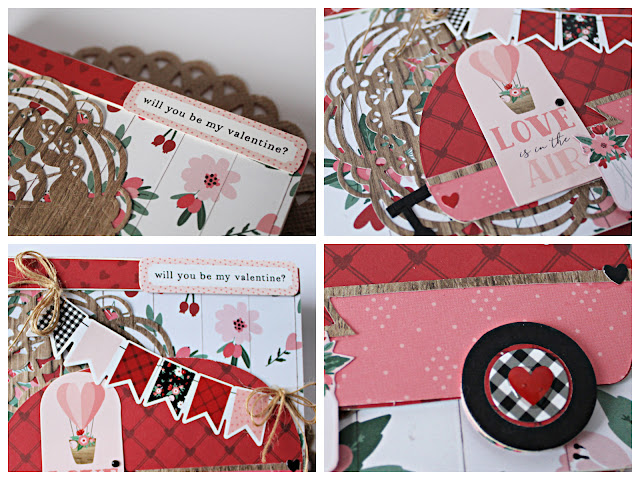
Photo 4: Die cut Heart Mandala from pattern paper; adhere to top of box. 


Photo 5: Decorate top of Hello Valentine candy Box using a sticker sentiment. 
Photo 6. Apply adhesive to top of mat board; add pattern paper. Die cut 3D Camper. Add to top of prepared candy box. 
Photo 7: Add sticker banner; door, and fussy cut jar to top of candy box. Add small natural twine bows to banner using Mini Glue Gun 
Photo 8: Add mat board wheel; apply glossy accent to top of heart sticker. 


Place chocolate candies inside of box. 
(I used a glue dot to hold them into place.)


Adhere Hello Valentine Journal Ephemera to inside top cover using Xyron Mega Runner with Permanent Adhesive.


Add metal handles and bead legs to prepared candy box with Glossy Accent. 


Create a match Hello Valentine Card.


Apply pattern paper to card front. 
Die cut Sizzix/Eileen Hull Snail Mail Thinlit Die from pattern paper; layer on mat on red card stock. 
Add to front of 4" x 5 1/2" card base with pop dots. 


Add banner to front of card and glue twine bows to card front. 


Add random stickers from the Hello Valentine paper collection to the Snail Mail squares. 


Add finished card to inside of Hello Valentine Candy Box. 
Enjoy Pam

SUPPLIES
Sizzix Mat Board
Red Card Stock
4" x 5 1/2" Card Base
Metal Handles
Red and White Beads
Natural Twine
Ranger Glossy Accent
Candy
Pop Dots

Make sure to stop by Eileen Hull's Blog to check out all the fabulous projects created all month long by the teams!
ALSO...
WON'T YOU COME JOIN US!!!
Lots of eye candy, fabulous tutorial, etc.
Best of all you don't want to miss Eileen's Live Shows!
Always so much fun!

I know you will truly be inspired! 
Enjoy Pam


DISCLAIMERS
This blog is compensated to provide opinion on products, services, websites, and various other topics. Even though the owner(s) of this blog receives compensation for our posts or advertisements. I always give my honest opinions, findings, beliefs, or experiences on those topics or products. The views and opinions expressed on this blog are purely my own. Any product claim, statistic, quote or other representation about a product or service should be verified with each manufacturer, provider, or party in question/This blog contains affiliate links, clicking and shopping through these links helps to support and run Pam Bray Designs - Scrapbook Flair Blog at no additional cost to you. Today's features are Eileen Hull Designs Products.

Friday, August 7, 2020

One Sheet Box Design with Authentique


Hi Authentique fans! Are ready to learn how to create a fun organizational boxes using one sheet of paper! 
How you decorate it though is all up to you! 
Authentique Scholastic Collection is perfect for those back to school gifts for teachers but if you are one of the many that are schooling at home it would be a good way to organize your students supplies! 


One Sheet Box Design Directions

Photo 1: Score on 4" and 8" marks on scoreboard.
Photo 2: Flip paper; score again on the 4" and 8" marks on scoreboard.
Photo 3: Score paper diagonally at each corner.
Photo 4: Fold vertical and horizontal score lines. Pinch corners on scored line. Make sure that you rub the edges good to get a crisp fold.


Photo 5: Punch holes at the diagonal fold edge.
Photo 6: Run ribbon or twine to pull edges together; tie in bow.


You can leave it just as simple as tying it together at the top...or...


You can decorate some of the squares with the Epherema Cards that come in the Scholastic Collection and some scallop border strips. 
(Add an extra square to the bottom to give additional support to the box.) 


Add a cute banner to the top by adding it to a short skewer.
 Fill with hour favorite supplies.


Have you seen Authentique Masquerade Collection? 
OH MY...
it is never to early to create start Halloween decorations and the organizational box is perfect for all those Halloween Treats!


REMEMBER..
decorate with as little or as much as you want. 
Each organizational box will be unique in  each of Authentique Collections! 
I added a fun Masquerade Mask to the top of my Halloween box along with some of the Elements from the Masquerade Collection.


Like I said earlier... 
Authentique Collections will make each of your organizational boxes unique. 
Enjoy Pam

Supplies:
Authentique Masquerade Paper Collection
Authentique Scholastic Paper Collection
Sizzix Masquerade Die
Scoreboard
Red Silk Ribbon
Small Hole Punch
Small Skewer
Adhesive

DISCLAIMERS
This blog is compensated to provide opinion on products, services, websites, and various other topics. Even though the owner(s) of this blog receives compensation for our posts or advertisements. I always give my honest opinions, findings, beliefs, or experiences on those topics or products. The views and opinions expressed on this blog are purely my own. Any product claim, statistic, quote or other representation about a product or service should be verified with each manufacturer, provider, or party in question/This blog contains affiliate links, clicking and shopping through these links helps to support and run Pam Bray Designs - Scrapbook Flair Blog at no additional cost to you. Today's features are Autentique Products.

Friday, April 10, 2020

A Basket Full of Joy with Authentique Easter Group Post


A Basket Full of Joy during this Easter Season!
 Each day should be filled with joy, smiles and love! 
Creating a basket using a chipboard box makes it super easy with Authentique Cottontail Collection; plus you can fill it full of special things for all your favorite peeps!  


Adhere pattern paper to chipboard box. 
Add strip from Cottontail pattern papers to form a handle. 
Create bow from pattern paper strips. 


Add pretty flowers to top of handle. 


Decorate the sides by fussing cutting images from the Cottontail Epherema Cards


Fill with fabulous goodies, candies or other favorite items. 


I hope you have fun hopping through the Authentique Design Teams Blogs.

Supplies:
Authentique Cottontail Collection
Sizzix/Eileen Hull Gift Box with Scallop Die
I AM Roses
Small Composition Book
Xyron Creative Station Lite with Permanent Adhesive
Xyron Mega Runner with  Permanent Adhesive
Pop Dots
Disclaimer:
This blog is compensated to provide opinion on products, services, websites, and various other topics. Even though the owner(s) of this blog receives compensation for our posts or advertisements. I always give my honest opinions, findings, beliefs, or experiences on those topics or products. The views and opinions expressed on this blog are purely my own. Any product claim, statistic, quote or other representation about a product or service should be verified with each manufacturer, provider, or party in question. This blog contains affiliate links, clicking and shopping through these links helps to support and run Pam Bray Designs - Scrapbook Flair Blog at no additional cost to you. Today's features are Authentique Products. 

Sunday, September 16, 2018

Love Gift Box....


(Disclaimer Notice: I’ve received products/compensation as part of the Diamond Press Design Team. This project however, is 100% my own project! Some of the links in this post are affiliate links. I explain more here.)

Diamond Press Love...How can you not love making flowers using Diamond Press Die Cutting Machine and the latest Flower Die Set! 


Begin your "Love" Box by adhering DCWV Simple Joy  using Xyron Adhesive Mega Runner. Add the word "love" to the front of the box along with a few small banner flags, border strips and clear gemstones. Add a small doily to top of box.


Die cut flowers from white cardstock; apply Clearsnap Colorbox Golden Blend Ink to the edges. Roll on a flower mat with stylus; use tweezers to shape flowers. Layer together using small brad.


Add bow and decorative bead to top of box. I hope you are inspired to create a few decorative boxes using Diamond Press Flowers or other fabulous dies that are available on HSN. Pam

Supplies:
Diamond Press Die Cutting Machine
Diamond Press Flowers
DCWV Simple Joy
Xyron Mega Runner
Clearsnap Colorbox Golden Blend Ink
4" Chipboard Box
Decorative Bead
Love Word
Small Brad
Clear Gemstones
White Card Stock


(Disclaimer Notice: I’ve received products/compensation as part of the Diamond Press Design Team. This project however, is 100% my own project! Some of the links in this post are affiliate links. I explain more here.)

Wednesday, June 7, 2017

How to Create a Father's Day Card and Gift Box with Xyron

Disclaimer Notice: I’ve received products/compensation as part of the  Xyron Design Team. This project however, is 100% my own project! Some of the links in this post are affiliate links. I explain more here.


Wow...it is June!!!!
How did that happen?
Are you starting to plan for Father's Day or the Fourth of July!
I am!!!
I created a Father's Day Card and Gift Box but it could easily be adapted for any holiday.
Using Xyron products with pretty paper makes it so easy to create some special and unique gifts.


"You're the Coolest Pop Ever" Card...


Begin by first cutting your pattern paper and corrugated paper to fit the front of your card.
Distress pieces with distress tool and distress ink.
Adhere to top of card front with a Xyron Tape Runner.


Apply crackle paste to corrugated paper with palette knife. Dry.


Cut two of the Epherema pieces from the pattern paper; distress sides of both pieces with distress tool and distress ink.
Adhere one piece to card front with Xyron Tape Runner.
Add second piece with pop dots.


Fussy cut two diamond images from pattern paper.
Distress edges with distress tool and distress ink.
Adhere one to top of card front with Xyron Tape Runner.
Add second with pop dots.
Glue button to top.


"This Guy" Gift Box


Begin you "This Guy" Gift Box by first cutting box using Sizzix Caddy Die, mat board, and pattern paper.


Run die cut pattern paper pieces through your Xyron Creative Station and Xyron 9" Permanent Adhesive.
Attach to top of mat board die cuts.


Ink edges with distress ink.


Place border and  sticker on center of caddy box.


Adhere flag to top of caddy box; apply paste with palette knife.
Fussy cut two images from pattern paper.
Place one in Xyron 3" Non-Refillable Sticker Maker; add to front of caddy box.


Adhere second to top with pop dots.


Add metals to box.


Fill with prepared "This Guy" Gift Box with favorite candies, gift cards, tickets, etc.


I hope you are inspired to grab your favorite Xyron products and create something special to give as a gift.
ALSO...
stop by and check out my Xyron team mates Nicole Wright and Katie King see what they have created.


Supplies:
PHOTO PLAY PAPER: This Guy Collection
Corrugated Paper
Finnabair Mechanicals
Tim Holtz Speckles Stencil
Ranger Pumice Stone Distress Ink
DecoArt Media: Crackle Paste
Distress Tool
Palette Knife
Blending Tool
Glue
Pop Dots

Follow Xyron

 photo PB Signature.png