Wednesday, April 13, 2022

Spring Home Card Set with Eileen Hull Inspiration Team


Spring is in the Air...time to think about yard work, planting pretty flowers and painting. 
I did just that but with using my cards as a canvas instead of actually doing it. 
So much easier when I am so inspired with Eileen Hull latest Chapter 2 release with Sizzix. 
I created a set of 3 Spring HOME Cards to celebrate the season! 


Spring HOME Card 


Begin by cutting lavender and green card stock along with pattern paper mats.
Die scallop from ShadowBox Frame; adhere to front of card.
Emboss using the Floral Mandala Embossing Folder; ink over the top with distress inks. 
Adhere mats together and place on card base. 

  
 Die cut leaves from ShadowBox Elements; add to front of card near scallop pieces.  
Die cut HOME plaque and small houses from ShadowBox Elements; add a few with pop dots to top of prepared card. 


Die cut flowers parts from ShadowBox Elements add to front along with pearl gemstones.  


MEMORIES Card


Cut lavender and green card stock; emboss using Floral Mandala Embossing Folder.
Adhere to front of card. 
Die cut Snail Mail Thinlit Die using pattern paper; adhere to front of card. 
Die cut HOME from ShadowBox Elements; add to front of card with pop dots. 


Cut flowers from ShadowBox Elements; form flowers. 
Add to card front along with twine bow and fussy cut elements from pattern paper. 


LOVE Card


Adhere lavender card stock to card base. 
Emboss white paper with Floral Mandala Embossing Folder; adhere to front of card. 
 Die cut leaves and flowers from the ShadowBox Elements add to front of card to form a heart. 
Add clear gemstones to inside of flowers. 


Die cut LOVE sentiment using lavender card stock and foam adhesive. 
Add to front of card base. 
Enjoy creating with Eileen Hull Designs. 
Pam

Supplies:
Sizzix 662813 Word Journal Thinlit Die
Ciao Bella Papers
Distress Inks
4 x 5 1/2" and 5 x 6 1/2 Card Bases
Green and Lavender Card Stock
Green Twine
Green Pearl and Clear Gemstones
Xyron Hot Glue Gun and Mega Runner
Wet Glue
Pop Dots

Make sure to stop by Eileen Hull's Blog to check out all the fabulous projects created all month long by the teams!
ALSO...
WON'T YOU COME JOIN US!!!
Lots of eye candy, fabulous tutorial, etc.
Best of all you don't want to miss Eileen's Live Shows!
Always so much fun!

I know you will truly be inspired! 
Enjoy Pam


DISCLAIMERS
This blog is compensated to provide opinion on products, services, websites, and various other topics. Even though the owner(s) of this blog receives compensation for our posts or advertisements. I always give my honest opinions, findings, beliefs, or experiences on those topics or products. The views and opinions expressed on this blog are purely my own. Any product claim, statistic, quote or other representation about a product or service should be verified with each manufacturer, provider, or party in question/This blog contains affiliate links, clicking and shopping through these links helps to support and run Pam Bray Designs - Scrapbook Flair Blog at no additional cost to you. Today's features are Eileen Hull Designs Products with Sizzix 

Tuesday, April 5, 2022

Mixed Media Home Shadow Box with Eileen Hull Designs


There is no place like HOME... a fun place to create when Eileen has a new release! 
Eileen Hull Designs Teams will be sharing our excitement using her Chapter 2 release with Sizzix! 
We are so looking to inspire you over the next weeks creating with them along with how to use the new dies with the dies you already have. 


To begin your HOME Shadowbox frame with die cutting two pieces of each die from brown card stock.
Emboss the pieces using Floral Mandala Embossing Folder.


Apply  Sizzix Luster Wax Rose Gold and Silver to the top of embossed pieces. 
Fold and form die cut frames. 


Glue frame together.
Die cut backing paper from Snail Mail Thinlit Die
Adhere to back of prepared frame. 


Die cut HOME from pattern paper using ShadowBox Elements, layer on brown card stock. 
Fussy cut around edges; add to paper with pop dots. 
Die cut small heart from red paper; add to HOME. 
Die cut and add clouds to inside of frame. 


Die cut flowers and leaves from ShadowBox Elements; add to frame. 
Add small gears to inside of flowers along with large gears on frame. 


Add small metal water can and bird to frame. 


Add metal corners to give a bit more dimension. 


Die cut small fence, homes, and grass from ShadowBox Elements add to inside of frame with pop dots. 


I hope you enjoy making your future shadow boxes along with other projects using Eileen's products. Enjoy Pam

Supplies:
Stamperia and Blank Page Muss Papers, 
Metal Gears, Water Can, Bird, Corners
Brown and Red Card Stock
Xyron Hot Glue Gun
Wet Glue
Pop Dots

Make sure to stop by Eileen Hull's Blog to check out all the fabulous projects created all month long by the teams!
ALSO...
WON'T YOU COME JOIN US!!!
Lots of eye candy, fabulous tutorial, etc.
Best of all you don't want to miss Eileen's Live Shows!
Always so much fun!

I know you will truly be inspired! 
Enjoy Pam


DISCLAIMERS
This blog is compensated to provide opinion on products, services, websites, and various other topics. Even though the owner(s) of this blog receives compensation for our posts or advertisements. I always give my honest opinions, findings, beliefs, or experiences on those topics or products. The views and opinions expressed on this blog are purely my own. Any product claim, statistic, quote or other representation about a product or service should be verified with each manufacturer, provider, or party in question/This blog contains affiliate links, clicking and shopping through these links helps to support and run Pam Bray Designs - Scrapbook Flair Blog at no additional cost to you. Today's features are Eileen Hull Designs Products with Sizzix 


Saturday, April 2, 2022

The Journey Notebook with Xyron


Life is Adventure Notebook 
 Creating with Xyron Inc is part of the adventure! 
Adventures should be exciting and fun and with Xyron Inc products you get both!


Begin by running matboard through Xyron Creative Station Lite with Permanent Adhesive
Apply pattern paper to top of matboard, die cut notebook out. 
Make notebook using 


Apply Blank Page Sweet Passion designer paper to top. 
Die cut using Sizzix Frame Die. 


Apply Rub Ons to pattern paper; adhere to front of prepared notebook. 
Add premade frame to front of notebook. Xyron Mini Glue Gun with Glue Sticks,
Add botanical images and embossed chipboard to front of notebook with Xyron Mini Glue Gun with Glue Sticks,
Add small pink twine bow to front of notebook with Xyron Mini Glue Gun with Glue Sticks.


Apply botanical to back of inside cover with Xyron Glue Stick. 


Adhere pattern paper to inside of prepared notebook. 


Adhere die cut mandala and ephemera to inside cover. 


Cover mini composition notebooks with Xyron Glue Sticks and decorate with rub-ons, twine and ephemera. 


Mini Composition One


Back of Mini Composition One 
Front Cover of Inside Page


Inside Pages with Pocket


Tags


Back Page 
Front of Mini Composition Book 2


Back of Composition 2


Tie elastic into binding. 
Add prepared Mini Composition Books and Page. 


Tie Ribbon and Metal Heart to binding. 


I hope you are always on an adventure with Xyron. 
Enjoy Pam

SUPPLIES:
Xyron Glue Sticks
Sizzix Frame Die
Tag and Border Punch
Rub Ons
Filigree Chipboard
Pink Twine
Purple Ribbon
Round Elastic 
Metal Heart

DISCLAIMERS
This blog is compensated to provide opinion on products, services, websites, and various other topics. Even though the owner(s) of this blog receives compensation for our posts or advertisements. I always give my honest opinions, findings, beliefs, or experiences on those topics or products. The views and opinions expressed on this blog are purely my own. Any product claim, statistic, quote or other representation about a product or service should be verified with each manufacturer, provider, or party in question/This blog contains affiliate links, clicking and shopping through these links helps to support and run Pam Bray Designs - Scrapbook Flair Blog at no additional cost to you. Today's features are Xyron Products.

Tuesday, March 15, 2022

Enjoy the Day with Vicki Robertson


Super excited to share Enjoy the Day ATC Cards that were created by my talented friend Vicki from He"artful Validation of Vicki Blog! 
The paper for these ATCs is from the Sensations collection and the sentiment is from the Little Things Stamp Set both part of my collections with Wild Whisper  
Stop by Vicki's Blog to see all the details about the post...
Enjoy Pam

Tuesday, March 8, 2022

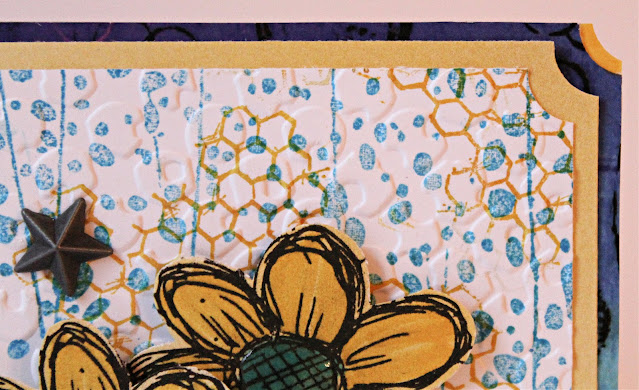
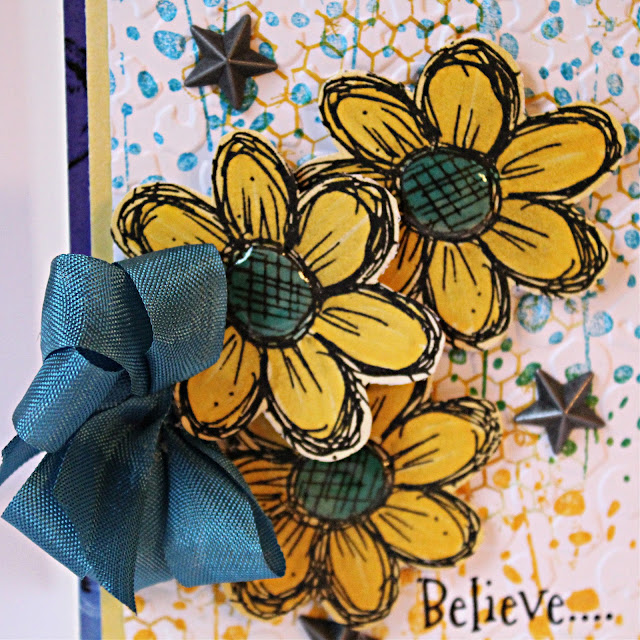
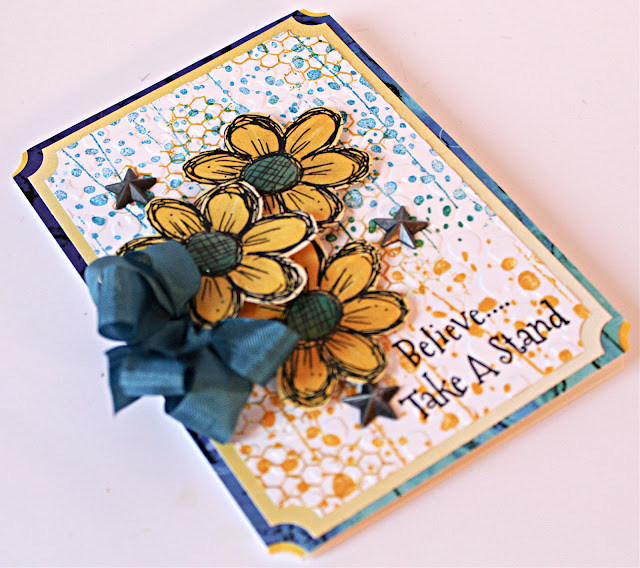
Believe...Take A Stand


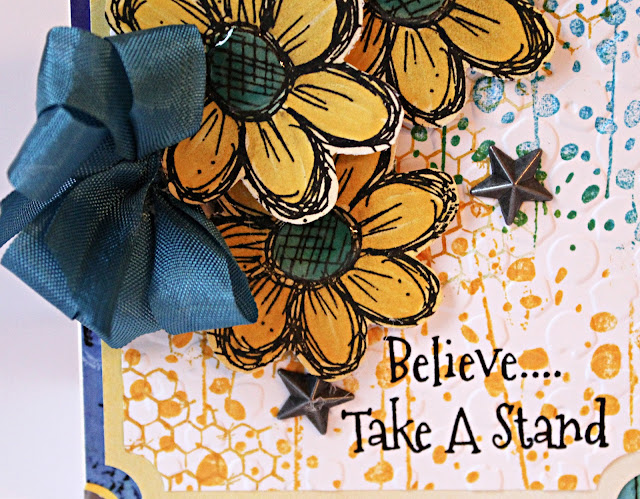
Believe...Take A Stand! 
With so much going on in each of our lives, our families, our countries, our world... we need to Believe...Take A Stand. 
Show love, friendship, endurance... a smile, a kind word, etc. 
Believe!


Corner punch card base and pattern paper. 
Adhere to front of card. 
Stamp Riverbed Background Stamp using Distress ink along with Chicken Wire Mesh Background Stamp.
Emboss prepared piece. 
Adhere prepared stamped piece to top of card front. 


Stamp Whimsical Daisy Doddle Flower Stamp on pattern paper; color a bit with markers. 
Fussy cut flowers out and place on card with pop dots. 


Stamp Believe...Take A Stand on card front with black ink. 
Add small stars with Glossy Accent. 
Fill in centers of flowers with Glossy Accent. 


Add small blue bow. 
Remember to always Believe! 
Pam

Supplies:
Creative Impression Altered Hexagon Embossing Folder
Ranger Archival Black Ink
Corner Punch
4" x 5 1/2" Card Base
Blue Ribbon
3 Small Metal Stars
Glossy Accent
Xyron Mega Adhesive 
Pop Dots

DISCLAIMERS
This blog is compensated to provide opinion on products, services, websites, and various other topics. Even though the owner(s) of this blog receives compensation for our posts or advertisements. I always give my honest opinions, findings, beliefs, or experiences on those topics or products. The views and opinions expressed on this blog are purely my own. Any product claim, statistic, quote or other representation about a product or service should be verified with each manufacturer, provider, or party in question/This blog contains affiliate links, clicking and shopping through these links helps to support and run Pam Bray Designs - Scrapbook Flair Blog at no additional cost to you. Today's features are with Blank Page Muse and Wild Whisper. 


Wednesday, March 2, 2022

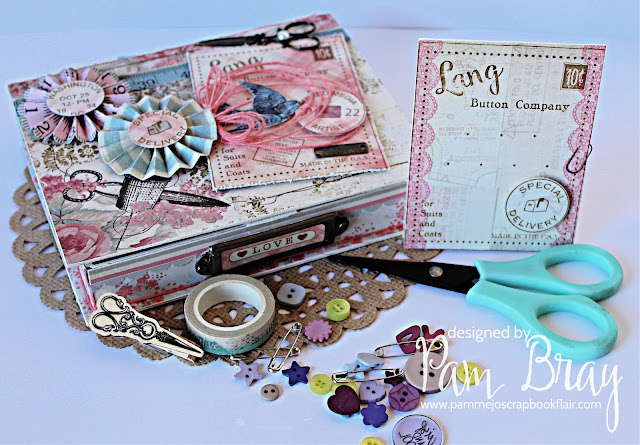
Sewing Box Essentials with Eileen Hull Designs Inspiration Team


Happy March with Eileen Hull's Teams! 
We are super excited to share different ways of using Fabric, Felt and Fibers in and on our projects! 
I created a Sewing Box Essential Box fill will fun elements using Eileen's new Book/Box Die #665873 from Sizzix. 


Die cut Book/Box Die #665873 from chipboard; cover with pattern paper. 


Decorate the top of the prepared box with rosettes, stamped images using Eileen Hulls from Maker Forte Stamps along with metal scissors and a color bird image from Ideology pack. 


Decorate inside of box with label and a border strip. 
Add small velcro piece to lid and top of box front. 


Use twine to finish the inside of box using hot glue gun. 


Wrap ribbon around box band; tie a bow. 


Add twine to the top off lid by forming a circle of twine and gluing into place. 
Add small twine bow to top. 


Add pink twine around the outside of prepared box using glue gun. 


Add metal label with sentiment to front of prepared Sewing Essential Box.


Fill magnetic tin with some fun bits and pieces. 


Create a gift card using pattern paper and stamps from Makers Forte. 
Adding small images that have been punched out to project gives a great addition of depth to the project. 


Fill with all those fabulous essentials you have created. 
I created a Birthday Set last week to fill my box up with as a birthday gift. 


CLICK here for the LINK.
Remember Fibers, Metals and other Elements give great detail to all your projects. 
Enjoy Pam

Supplies:
Sizzix Rosette Set #662691
Ideology Engraving Set
Authentique Stitches Paper Collection
Metal Label and Scissors
Sewology Accessories and Sewing Bits and Pieces
Scallop Border Punch
Distress Tool
Pink and Natural Twine 
Blue Ribbon
Brown and Red Ink
Blue Marker
4 1/4" x 5 1/2" Card Base
Xyron Adhesive, Hot Glue Gun, Sticker Maker
Pop Dots
Pink and Grey Card Stock

Make sure to stop by Eileen Hull's Blog to check out all the fabulous projects created all month long by the teams!
ALSO...
WON'T YOU COME JOIN US!!!
Lots of eye candy, fabulous tutorial, etc.
Best of all you don't want to miss Eileen's Live Shows!
Always so much fun!

I know you will truly be inspired! 
Enjoy Pam


DISCLAIMERS
This blog is compensated to provide opinion on products, services, websites, and various other topics. Even though the owner(s) of this blog receives compensation for our posts or advertisements. I always give my honest opinions, findings, beliefs, or experiences on those topics or products. The views and opinions expressed on this blog are purely my own. Any product claim, statistic, quote or other representation about a product or service should be verified with each manufacturer, provider, or party in question/This blog contains affiliate links, clicking and shopping through these links helps to support and run Pam Bray Designs - Scrapbook Flair Blog at no additional cost to you. Today's features are Eileen Hull Designs Products with Sizzix and Maker Forte.