Showing posts with label copic markers. Show all posts

Wednesday, February 16, 2022

Wonderful World Phone Stand with Eileen Hull Designs Inspiration Team


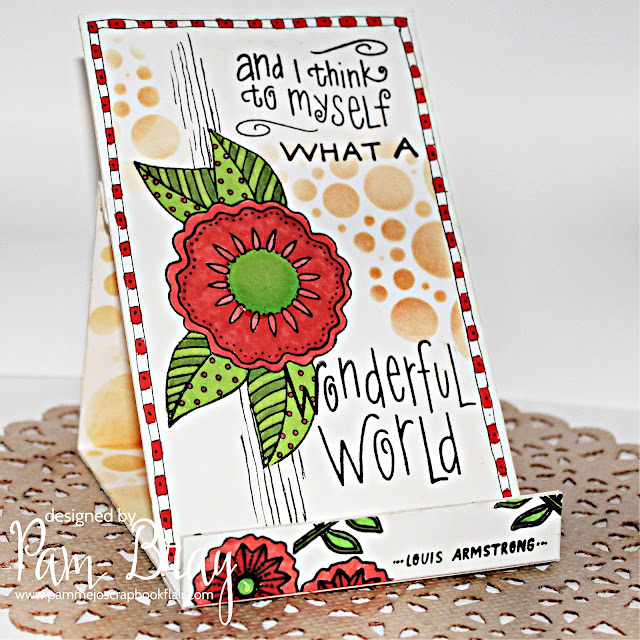
It's a wonderful world when you can do the things you love to do, be with the people you love, and just celebrate life. 
 Maker Forte/ Eileen Hull Designs Wonderful Life Stamps along with Sizzix/Eileen Hull Designs Phone Stand to create an easy and fabulous project for your home or for wonder gifts throughout the year. 


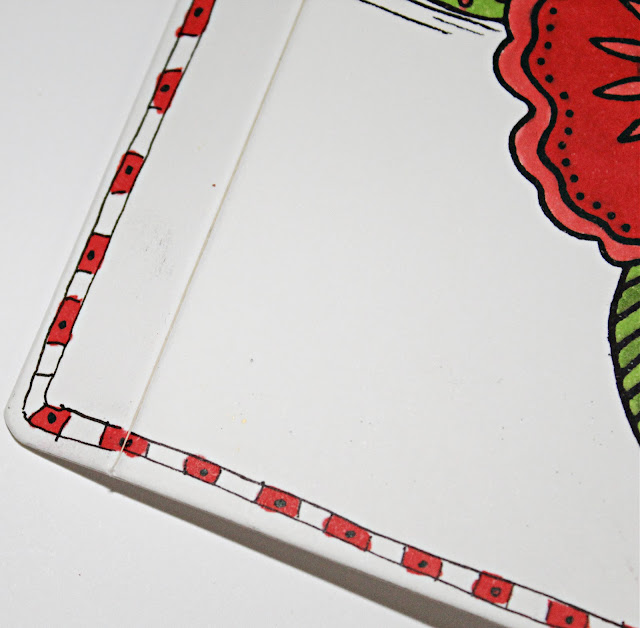
Begin by cutting the Phone Stand from white mat board, doodle along the edges using pen. 
Color with markers. 


Stamp image from Wonderful Life Stamps using black ink. 
Color with markers. 


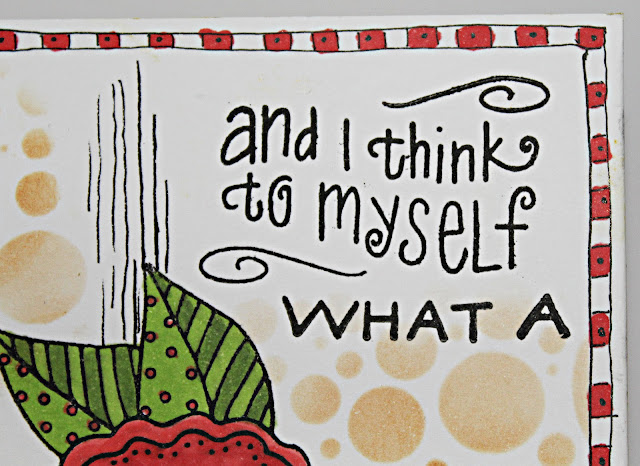
Cut sentiment in 3 parts: stamp first part with black ink to phone stand. 
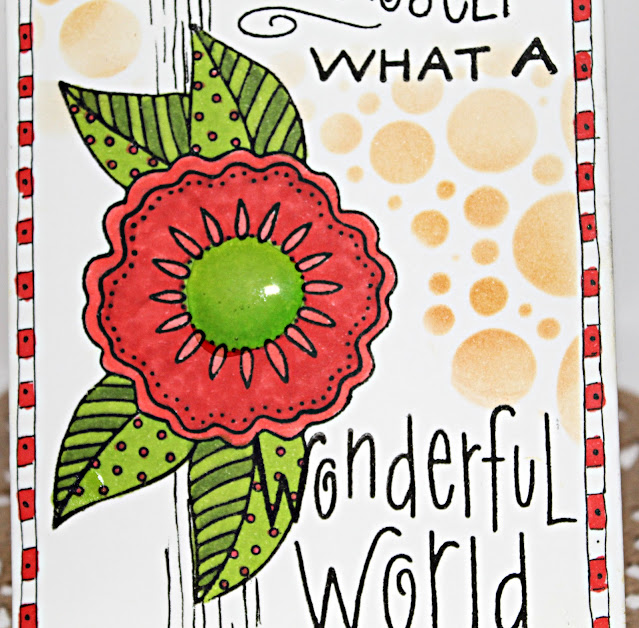
Do additional line work using black pen. 


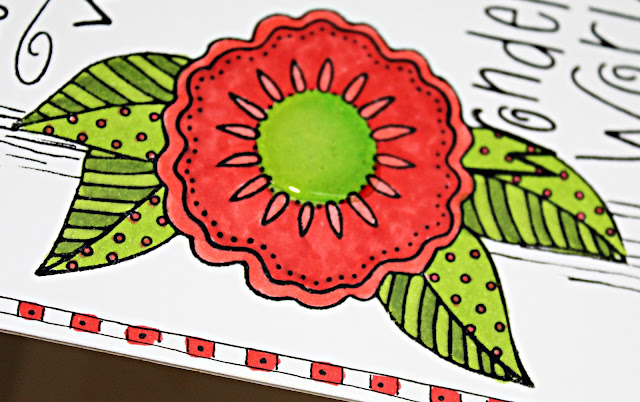
Add Glossy Accent to center of flower; dry. 


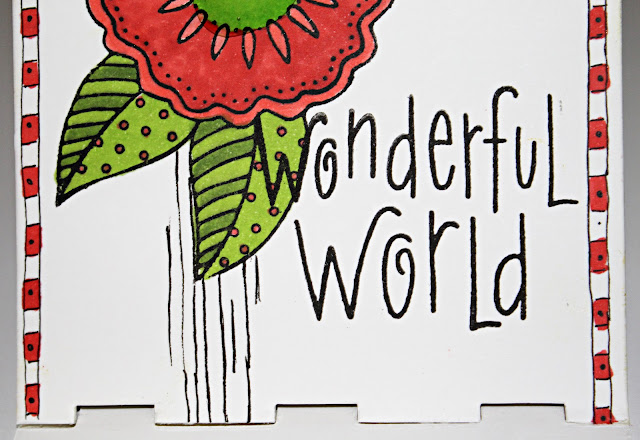
Stamp second part of sentiment to bottom of phone stand. 


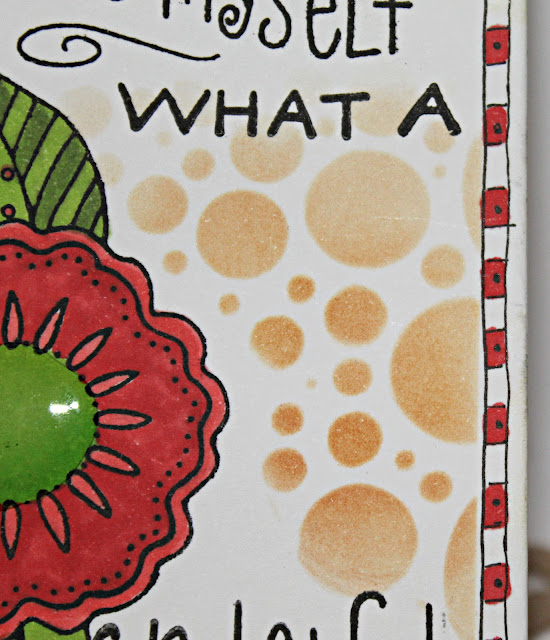
Lay stencil on phone stand; apply distress ink to top with blending tool. 


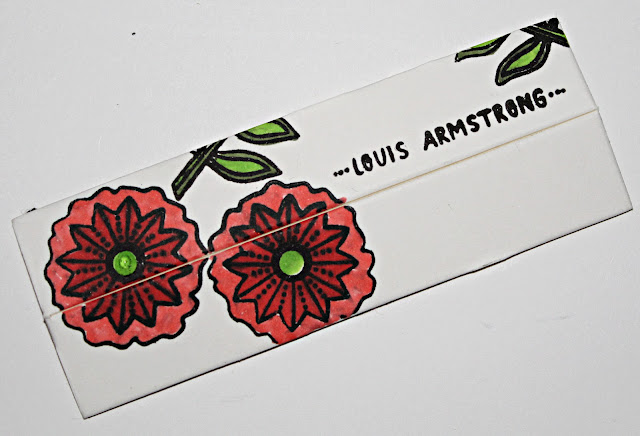
Stamp third part of sentiment to smaller phone stand piece. 
Stamp and color flowers from Wonderful Life Set Stamp; color with markers. 
Add Glossy Accent; dry. 


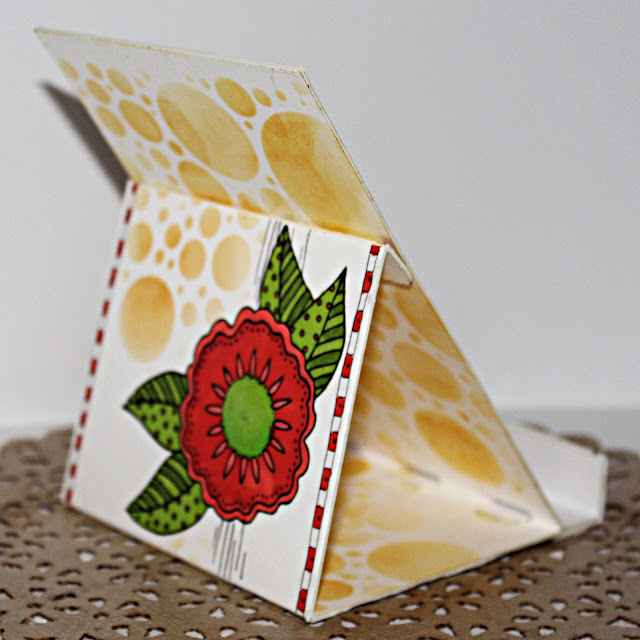
Turn prepared and dry phone stand over; apply distress ink over stencil using blending tool. 
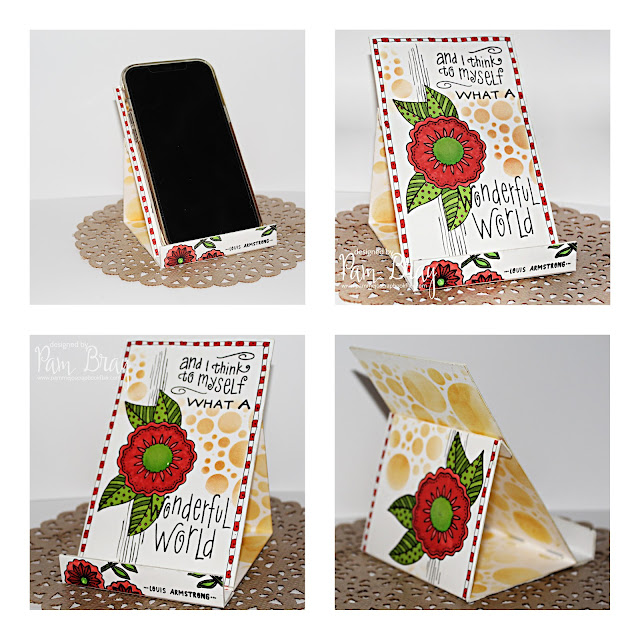
Form phone stand and enjoy!
Pam

Supplies:
Sizzix Matboard
Signa Pigma Marker .02 
Copic Markers

Make sure to stop by Eileen Hull's Blog to check out all the fabulous projects created all month long by the teams!
ALSO...
WON'T YOU COME JOIN US!!!
Lots of eye candy, fabulous tutorial, etc.
Best of all you don't want to miss Eileen's Live Shows!
Always so much fun!

I know you will truly be inspired! 
Enjoy Pam


DISCLAIMERS
This blog is compensated to provide opinion on products, services, websites, and various other topics. Even though the owner(s) of this blog receives compensation for our posts or advertisements. I always give my honest opinions, findings, beliefs, or experiences on those topics or products. The views and opinions expressed on this blog are purely my own. Any product claim, statistic, quote or other representation about a product or service should be verified with each manufacturer, provider, or party in question/This blog contains affiliate links, clicking and shopping through these links helps to support and run Pam Bray Designs - Scrapbook Flair Blog at no additional cost to you. Today's features are Eileen Hull Designs Products.

Friday, June 4, 2021

You're the Best with Emerald Creek Craft Supplies


You're the Best...Prairie Lilies!!!
They come in so many colors and are one of the first flowers of the season to bloom!

Each of my Province/United States Flowers are hand drawn and manufactured by Emerald Creek Craft Supplies based in Alberta, Canada.


 Begin by adhering pattern paper to the top of a 5" x 6 1/2" card base. 
Die cut Mandala Die from pattern paper.
Stamp the Prairie Lily/Saskatchewan Province Flower one white card stock using Ranger Archival ink. 
Color with your favorite markers. (I used Copic Markers)
Die cut colored Prairie Lily and pattern paper using Sizzix Deckle Dies. 
Adhere to front of prepared card base. 
Stamp favorite sentiment using black ink on white card stock; mat on pattern paper. 
Add to front of card front with pop dots. 
Add twine bow to stem of Prairie Lily. 

Monday, May 24, 2021

Celebrate with Wild Roses!!!


Happy Monday!!!
Do you love "Slimline" Cards!!!
Today I am sharing how to create a fabulous card using Emerald Creek Craft Supplies Wild Rose/Alberta Province Flower Stamp
Each of my Province/United States Flowers are hand drawn and manufactured by Emerald Creek Craft Supplies based in Alberta, Canada.


Begin by adhering a piece of Wild Whisper/Pam Bray Designs Wild Whisper red mixed media paper to the top of a 3 1/2" x 8 1/2" card base. 
Stamp the  Wild Rose/Alberta Province Flower Stamp multiple times on a piece of white card stock using Ranger Archival ink. 
Color with your favorite markers. (I used Copic Markers)
Adhere to front of prepared card base. 
Add a strip of red mixed media and border strip from the Carefree Collection to the top of prepared colored image.
Stamp and color a few extra of the  Wild Rose/Alberta Province Flower Stamp to white card stock. 
Fussy cut flowers and add to front of card with pop dots. 
Tie light green twine bow to front of card. 
Stamp favorite sentiment using black ink on white card stock; mat on black card stock. 
Add to front of card front with pop dots. 

Province Flowers: Set One

 Supplies:
May Art Lime Green Twine
Black and White Cardstock 
3 1/2" x 8 1/2" White Card Base

Pam Bray Designs/Emerald Creek Crafts Shop HERE

Wednesday, February 12, 2020

Moments with Xyron


Moments...
Need to be Cherished!
Memories....
Need to be Treasured!
Creating cards and other paper crafting projects help each to be reflected on. 
So reflection makes it so easy when you are using your favorite Xyron products. 


I created my Moments Card by first stamping a background and heart to pattern paper with black ink; coloring them with Copic Markers. 


Begin by adhering pattern paper to top of 5" x 6 1/2" cream base using Xyron Mega Tape Runner with Permanent Adhesive.
Adhere mats together along with prepared colored image and border strips together using Xyron Mega Tape Runner with Permanent Adhesive.


Adhere prepared mats to top of card base with Xyron Mega Tape Runner with Permanent Adhesive.


Wrap ribbon around prepared mats; add to card base with pop dots. 


Stamp sentiment to pattern paper using black ink.
Run prepared stamped sentiment through Xyron 1.5" Sticker Maker.


Add prepared stamped and color heart to top of card base with pop dots. 


Add black gemstones to finish card. 


I hope you create your "moments" and "memories" using Xyron. Enjoy Pam

Supplies:
Xyron Mega Tape Runner with Permanent Adhesive
Blank Page Muse Berry Collage Background Stamp
Blank Page Muse Memories Stamp Set
Authentique Love Notes Collection
Copic Markers
Scallop Border Punch
Pink Satin Ribbons
Black Gemstones
Black Ink
Pop Dots
5" x 6 1/2" Cream Card Base

DISCLAIMER:
This blog is compensated to provide opinion on products, services, websites, and various other topics. Even though the owner(s) of this blog receives compensation for our posts or advertisements. I always give my honest opinions, findings, beliefs, or experiences on those topics or products. The views and opinions expressed on this blog are purely my own. Any product claim, statistic, quote or other representation about a product or service should be verified with each manufacturer, provider, or party in question.This blog contains affiliate links, clicking and shopping through these links helps to support and run Pam Bray Designs - Scrapbook Flair Blog at no additional cost to you. Today's features are Xyron Products.

Thursday, July 13, 2017

Happy Birthday...I Am Thinking Of You Today with Stampendous!


Happy Birthday...I am thinking of you today!!!


Cut and distress edges on card stock with distress tool. ink edges.
Adhere to card front.
Lay stencil on white paper; apply inks with blending tool.
Distress edges with distress tool.
Adhere to card front.


Wrap twine around card and tie in to bow.


Stamp image on white paper with black ink; color with markers.
Distress edges of prepared image and card stock mats.
Adhere together.
Add to front of card with pop dots.


Stamp sentiment on white paper with black ink.
Distress edges of stamped sentiment and card stock mats; adhere together.
Add to front of card with pop dot.
Add gemstones.

Thanks for stopping by today and remember to check out Stampendous for fabulous stamps and embossing needs.
Hugs Pam

Stampendous Supplies:
CHMP75 Birthday Chick
DWLJ801
SSCHM5003 Friend Wishes
SSH57 Jumbo Perfectly Clear™ Acrylic Handle
MEM01 Memento™ Tuxedo Black Ink by Tsukineko®
MPW811 Mixed Media White Paper

Other Supplies:
Copic Markers: B02, B04, B06, YG03, YG05, Y63, V15, V17, R22, R24, E31, E33, N2, N3, N4
Ranger Distress Inks: Fossilized Amber and Twisted Citron
My Colors Card Stock: Mint Jubilee and Fireflies
Creative Impressions Twine
Blending Tool
Distress Tool
Clear Gemstones
4 1/2" x 5 1/2" Card Base
Xyron Mega Runner
Pop Dots
 photo PB Signature.png

Friday, June 30, 2017

Keeping Cool with Stampendous!


What a fun week it has been with Stampendous...the team has been sharing lots of Keeping Cool projects.
I created a Mixed Media Canvas using Stampendous Stylized Whale Stamp along with lots of fragments.


Apply gesso to canvas; dry.
Apply yellow, yellow-green, red and blue paint randomly to canvas; dry.
Apply Weathered Wood; dry. Repeat with crackle paste. Dry.


Trace white paper to fit behind the chipboard frame.
Stamp image on white paper. Adhere to top of canvas with Decoupage.
Wash over prepared canvas with wash of blue paint. Dry.
Apply Decoupage over top of canvas; dry.


Apply Boss Gloss to chipboard; add rust embossing powder.
Heat with embossing gun.
Adhere to top of prepared canvas with Decoupage. Dry.
Dab boss gloss randomly over chipboard and painted paper; add teal embossing powder.
Heat set with embossing gun.
Apply wet glue randomly over chipboard and painted paper; add fragments to glue. Dry.
Spatter prepared canvas with white and black paint; dry.
Lay stencil on prepared canvas; apply paste with palette knife. Dry.
Stamp image on white paper with black ink; fussy cut out. Adhere to center of prepared canvas.


Keep Cool and have a great day.
Hugs Pam

Stampendous Supplies:
CRP302 Stylized Whale
DWLJ713 Amsterdam Flourish Stencil
Boss Gloss
EJS05 Spoonful of Rust
FRC14 Hunter Fragment
FRC12 Burgundy Fragment
FRC06 Ochre Fragment
FRC09 Purple Fragment
FREG036 Aged Teal Enamel
SSH57 Jumbo Perfectly Clear™ Acrylic Handle
MEM01 Memento™ Tuxedo Black Ink by Tsukineko®
MPW811 Mixed Media White Paper
HT400 Embossing Heat Tool

Other Supplies:
Copic Markers: R22, R24, R27, V17, V19, YR23, YG05, YG63, V15, V17, B02
DecoArt Media Paints: Primary Yellow, Yellow Green Light, Cadmium Red Hue, Cerulean Blue, Titanium White, Carbon Black,  Crackle Paste, Gesso, Decoupage, Weathered Wood
Paintbrush
8" x 8" Canvas
Scotch Quick Dry Glue
Gypsy Soul Laser Cuts Scribble Chipboard Frame

Thursday, June 15, 2017

Create You Life with Lynda Kanase Succulent Collection

Disclaimer Notice: I’ve received products/compensation from Lynda Kanase. This project however, is 100% my own project! Some of the links in this post are affiliate links. I explain more HERE!.


Today I am sharing my 8" x 8" canvas using Lynda Kanas Succulent Collection from Sizzix!
The  Succulent 6" x 12" Card Stock Pad is a beautiful hues of colors and works perfectly with Succulent Coloring Art Journal .


Begin by coloring two of the pages from the Succulent Coloring Art Journal
Run two pieces of pattern paper and fussy cut coloring page through Xyron Creative Station using permanent adhesive.


Adhere prepared papers and coloring page to canvas.


Add strips of pattern paper to canvas along with lace.
Add fussy cut succulent to top with pop dots.


Add gemstone to eye of bird.


Add colored bird to top of canvas with pop dots.


Add small metal brad to lace.


I hope you are inspired to check out all of Lynda Kanase latest Succulent Collection from Sizzix!!!
Hugs Pam

Supplies:
 photo PB Signature.png